Monday 30 September 2013

This tutorial was written by me on September 30, 2013.
It was made out of my own creation and any similarity is purely coincidental.
I used PSPx2 but any version will do.
Artist: Anna Marine
You can find this tube at Creative Design Outlet HERE
Please Don't use this tube without a license.
Scrap Kit: Exclusive Fall Magic by Amy Marie's Kits HERE
Mask: WSL 84 HERE
Font: Riesling Font HERE
Here goes:
Let’s start
with the mask layer:
New Raster – 800 X 800.
Open PP1. Open mask and minimize.
SELECTIONS – SELECT ALL – Copy and paste PP1 into selection.
Go to LAYERS – NEW MASK LAYER – FROM IMAGE – SOURCE LUMINANCE - CHECKED – from menu, find WSL 84 – OK. Duplicate and merge down. Re-size 110%.
Let’s do the frame layer now:
New Raster – 800 X 800.
Open PP1. Open mask and minimize.
SELECTIONS – SELECT ALL – Copy and paste PP1 into selection.
Go to LAYERS – NEW MASK LAYER – FROM IMAGE – SOURCE LUMINANCE - CHECKED – from menu, find WSL 84 – OK. Duplicate and merge down. Re-size 110%.
Let’s do the frame layer now:
Element 67 - C/P and leave in middle of tag.
Element 112 – C/P and re-size 90%. Grab your magic wand. Click in the middle of element 112. SELECTIONS – MODIFY – EXPAND 8 PIXELS. New Raster Layer. Move under frame layer. Open PP2. Copy and paste into selection. Keep selected.
Grab the tube you wish to use and re-size 90% and move into place.
SELECTIONS - INVERT - DELETE - SELECTIONS - INVERT.
Duplicate the tube layer. ADJUST – BLUR – GAUSSIAN BLUR – RADIUS 25 - OK
Change BLEND MODE of copy of tube layer to HARD LIGHT and go to original tube layer and change BLEND MODE to SCREEN
(see tag for placement)
Element 37 – C/P and re-size 75%. Move to left side of tag. Duplicate and mirror. Move both layers behind paper layer.
(see tag for placement)
Element 103 – C/P and move to the left side of tag moving these layers over element 67 layer. Duplicate and mirror.
(see tag for placement)
Element 9 – C/P over paper layer. Re-size 80%. Move to top left corner of element 112. Duplicate, mirror and flip.
(see tag for placement)
Now for some more elements after tube layers:
Element 64 - C/P and re-size 60%. Move to bottom left corner of element 112. Mirror then flip.
(see tag for placement)
Element 72 - C/P and move to right corner of element 112. Duplicate and mirror.
(see tag for placement)
Element 71 – C/P and move to left corner of element 112. Duplicate and mirror.
(see tag for placement)
Element 32 - C/P and re-size 60%. Mirror and move to bottom left corner in front of element 71.
(see tag for placement)
Element 123 - C/P and re-size 80%. Move to bottom left corner of tag in front of element 32.
(see tag for placement)
Element 120 - C/P and re-size 70%. Move to bottom right corner of copy of element 71.
(see tag for placement)
Element 31 - C/P and re-size 50%. Move to top left corner of element 112.
(see tag for placement)
Element 3 - C/P and re-size 65%. Mirror and move to top right corner of element 112.
(see tag for placement)
Element 43 - C/P and re-size 40%. Free rotate 45º left. Move to left middle of element 112.
(see tag for placement)
Element 7 - C/P and re-size 40%. Move to bottom middle of tag.
(see tag for placement)
Add drop shadow to layers of your choosing.
I used:
V & H 2
Opacity 70
Blur 7
Color Black
Now you can add name and © information. Save as .png and re-size if you wish.
I re-size before I save and add
name and © info.
Let me know what you think of
this tutorial.
PTU Sexy Lil Witch
This tutorial was written by me on September 30, 2013.
It was made out of my own creation and any similarity is purely coincidental.
I used PSPx2 but any version would work.
Artist: Verymany
You can find his tubes at Pics For Design HERE
Do not use this tube unless you have a license.
Scrap Kit: Born To Fly by Horseplay Pasture
You can find this kit at Scraps From The Heart Store HERE
Mask: WSL 81 (Wee Scott Lass) HERE
Template: Template 109 by Blissfully Beth HERE
Font: Party Business Font HERE
Here goes:
The Template first:
Open template in PSP. Hold down
SHIFT button and tap your “D” key. Close
the original template. Delete the “Credits”
layer with her CR info.
I don't like a white background unless I really need one, so I clear the
white background by highlighting the Raster 1layer and go to
EDIT - CLEAR.
EDIT - CLEAR.
Next
I changed the canvas size to 800 X 800. We are gonna do basically the
same thing for the following layers, so in an effort to stop repeating
myself, here is what you will do for each layer that we change out:
Highlight layer. SELECTIONS - SELECT ALL - FLOAT - DE FLOAT
Open Paper - C/P - SELECTIONS - INVERT - DELETE - SELECTIONS - SELECT
NONE
Delete layer.
So it will go something like this:
You
will be changing these layers: grey rect, orange rect frame, black rect, white rect, and oval. We will also be changing the color of the Sexy Lil Witch word art. Delete Sexy Lil Devil Word Art.
Highlight grey rect. Follow directions above. Use P4. Rename it grey rect P4.
Highlight orange rect. Same as above. Use P15. Rename orange rect frame P15.
Highlight black rect. Same as above. Use P5. Rename black rect P5.
Highlight white rect. Same as above. Use P8. Rename white rect P8.
Highlight oval. Same as above. Use P3. Rename oval P3
We will change the orange on the word art by going to
ADJUST - HUE AND SATURATION - HUE/SATURATION/LIGHTNESS and using the following settings:
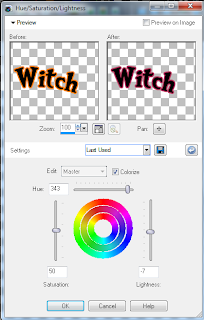 (see tag for placement)
Highlight orange rect. Same as above. Use P15. Rename orange rect frame P15.
Highlight black rect. Same as above. Use P5. Rename black rect P5.
Highlight white rect. Same as above. Use P8. Rename white rect P8.
Highlight oval. Same as above. Use P3. Rename oval P3
We will change the orange on the word art by going to
ADJUST - HUE AND SATURATION - HUE/SATURATION/LIGHTNESS and using the following settings:

We are gonna use our tube now.
Open tube, choose your favorite version. C/P and move over oval P3 and then duplicate tube.
Highlight the oval P3 and go to SELECTIONS - SELECT ALL - FLOAT - DE-FLOAT - SELECTIONS - INVERT - Highlight both tube layers one a a time, then hit DELETE. Merge tube layers. Duplicate tube layer. On the copy of tube layer:
ADJUST – BLUR – GAUSSIAN BLUR – RADIUS 25 - OK
Change BLEND MODE of copy of tube layer to HARD LIGHT and go to original
tube layer and change BLEND MODE to SCREEN.
(see tag for placement)
Now for some elements:
Element 75 - C/P and move to top right corner of tag. Duplicate and mirror.
(see tag for placement)
Element 76 - C/P and re-size 40%. Move to top right corner over Element 75. Duplicate and mirror and free rotate left 50º.
(see tag for placement)
Element 16 - C/P and move to bottom right side of tag.
(see tag for placement)
Element 74 - C/P and move to bottom right side of tag.
(see tag for placement)
Element 15 - C/P and re-size 80%. Move to bottom right side of tag.
(see tag for placement)
Element 35 - C/P and re-size 50%. Move to top and little bit right on tag.
(see tag for placement)
Element 50 - C/P and move to bottom left corner of tag.
(see tag for placement)
Element 29 - C/P and re-size 50%. Move to bottom right side of tag.
(see tag for placement)
Element 62 - C/P and re-size 50%. Move to bottom right corner of tag.
(see tag for placement)
Element 69 - C/P and re-size 30%. Move to bottom right corner of tag in front of element 62.
(see tag for placement)
Now for the tube(s):
If you are using the same tube as me, C/P the version your choosing to use. Re-size by 50%. Move to bottom middle of tag.
Now for the mask layer:
Open P2.
Highlight very bottom layer. SELECTIONS - SELECT ALL
Highlight very bottom layer. SELECTIONS - SELECT ALL
Copy and paste P2 into Selection.
Go to LAYERS – NEW MASK LAYER – FROM IMAGE – SOURCE LUMINANCE CHECKED –
CHOOSE WSL 81 from the drop down menu – OK. Duplicate and merge down. Re-size 120%.
Add drop shadow to layers of your choosing.
I used
V & H 2
Opacity 70
Blur 7
Color Black
Now you can add name and © information. Save as .png and re-size if you wish.
Now you can add name and © information. Save as .png and re-size if you wish.
I re-size before I save and add name and © info.
Let me know what you think of this tutorial.
Sunday 29 September 2013

This tutorial was written by me on September 29, 2013.
It was made out of my own creation and any similarity is purely coincidental.
I used PSPx2 but any version will do.
Artist: Ellie Milk
You can find this tube at Pics For Design HERE
This tube was an exclusive and can only be
purchased if you belong to the Exclusive Club and Pics For Design.
Please Don't use this tube without a license.
Scrap Kit: Vanity2 by Amy Marie's Kits HERE
Mask: WSL 84 HERE
Font: Intrique Script Font HERE
Here goes:
Let’s start
with the mask layer:
New Raster – 800 X 800.
Open PP13. Open mask and minimize.
SELECTIONS – SELECT ALL – Copy and paste PP13 into selection.
Go to LAYERS – NEW MASK LAYER – FROM IMAGE – SOURCE LUMINANCE - CHECKED – from menu, find WSL 84 – OK. Duplicate and merge down. Re-size 110%.
I did a second mask layer. Same as above except I used PP1 and I did not duplicate or re-size.
Let’s do the frame layer now:
Element 39 – C/P and free rotate 90º right. Move up and left on tag.
Grab your magic wand. Click in the middle of element.
SELECTIONS – MODIFY – EXPAND 8 PIXELS.
New Raster Layer. Move under frame layer. Open PP10. Copy and paste into selection. Keep selected.
If you are using the same tube as me, C/P now and re-size 50%.
Grab your magic wand. Click in the middle of element.
SELECTIONS – MODIFY – EXPAND 8 PIXELS.
New Raster Layer. Move under frame layer. Open PP10. Copy and paste into selection. Keep selected.
If you are using the same tube as me, C/P now and re-size 50%.
Move it into position. Go to SELECTIONS - INVERT - DELETE -
SELECTIONS - INVERT.
Duplicate the tube layer. ADJUST – BLUR – GAUSSIAN BLUR – RADIUS 25 - OK
Change BLEND MODE of copy of tube layer to HARD LIGHT and go to original tube layer and change BLEND MODE to MULTIPLY.
Change OPACITY to 55%.
(see tag for placement)
Duplicate the tube layer. ADJUST – BLUR – GAUSSIAN BLUR – RADIUS 25 - OK
Change BLEND MODE of copy of tube layer to HARD LIGHT and go to original tube layer and change BLEND MODE to MULTIPLY.
Change OPACITY to 55%.
(see tag for placement)
Now for some more elements after tube layers:
Element 76 - C/P and mirror. Move to right side of tag.
(see tag for placement)
Element 99 - C/P and re-size 50%. Move to bottom left side of tag.
(see tag for placement)
Element 93 – C/P and move to bottom left side of tag.
(see tag for placement)
Element 98 - C/P and re-size 50%. Mirror and move to bottom left side of tag.
(see tag for placement)
Element 89 - C/P and re-size 40%. Move to bottom left side of tag.
(see tag for placement)
Element 12 - C/P and re-size 30%. Move to bottom left side of tag.
(see tag for placement)
Element 1 - C/P and re-size 50%. Move to bottom left side of tag.
(see tag for placement)
Element 28 - C/P and re-size 20%. Move to bottom left side of tag.
(see tag for placement)
Element 90 - C/P and re-size 20%. Move to bottom left side of tag.
(see tag for placement)
Element 33 - C/P and re-size 25%. Move to bottom left side of tag.
(see tag for placement)
Element 3 - C/P and re-size 20%. Move to bottom left side of tag.
(see tag for placement)
Element 16 - C/P and re-size 50%. Move to bottom middle of tag.
(see tag for placement)
Add drop shadow to layers of your choosing.
I used:
V & H 2
Opacity 70
Blur 7
Color Black
Now you can add name and © information. Save as .png and re-size if you wish.
I re-size before I save and add
name and © info.
Let me know what you think of
this tutorial.
Saturday 28 September 2013

This tutorial was written by me on September 28, 2013.
It was made out of my own creation and any similarity is purely coincidental.
I used PSPx2 but any version will do.
Artist: Arthur Crowe
You can find this tube at Arthur Crowe's Factory HERE
Please Don't use this tube without a license.
Scrap Kit: Vanity by Amy Marie's Kits HERE
Mask: WSL 84 HERE
Font: Brock Script Font HERE
Here goes:
Let’s start
with the mask layer:
New Raster – 800 X 800.
Open PP13. Open mask and minimize.
SELECTIONS – SELECT ALL – Copy and paste PP13 into selection.
Go to LAYERS – NEW MASK LAYER – FROM IMAGE – SOURCE LUMINANCE - CHECKED – from menu, find WSL 84 – OK. Duplicate and merge down. Re-size 110%.
Let’s do the frame layer now:
New Raster – 800 X 800.
Open PP13. Open mask and minimize.
SELECTIONS – SELECT ALL – Copy and paste PP13 into selection.
Go to LAYERS – NEW MASK LAYER – FROM IMAGE – SOURCE LUMINANCE - CHECKED – from menu, find WSL 84 – OK. Duplicate and merge down. Re-size 110%.
Let’s do the frame layer now:
Element 40 - C/P and leave in middle of tag.
Element 41 – C/P and re-size 90%. Grab your magic wand. Click in the middle of element. SELECTIONS – MODIFY – EXPAND 8 PIXELS. New Raster Layer. Move under frame layer. Open PP3. Copy and paste into selection. Keep selected.
Grab the version of tube you wish to use and move into place.
SELECTIONS - INVERT. Grab the eraser tool. Erase the bottom part of tube that hangs over frame.
(see tag for placements)
Element 77 – C/P and re-size 75%. Move to top right corner under frame layer. Duplicate and mirror.
(see tag for placement)
Element 14 – C/P and leave in the middle behind tube.
(see tag for placement)
Element 81 – C/P and leave it where it lands.
(see tag for placement)
Element 23 – C/P and re-size 60%. Move to middle right over frame layer. Duplicate and mirror.
(see tag for placement)
Now for some more elements after tube layers:
Element 22 - C/P and re-size 75%. Move to bottom right of frame. Duplicate and mirror.
(see tag for placement)
Element 5 - C/P and re-size 60%. Move to bottom middle of frame.
(see tag for placement)
Element 100 – C/P and re-size 70%. Move to bottom right corner of tag.
(see tag for placement)
Element 101 - C/P and re-size 70%. Move to bottom right corner of tag in front of element 100.
(see tag for placement)
Element 36 - C/P and re-size 50%. Move to bottom right corner in front of element 101.
(see tag for placement)
Element 13 - C/P and re-size 60%. Move to bottom left corner of tag.
(see tag for placement)
Element 18 - C/P and re-size 70%. Move to bottom left corner of tag in front of element 13.
(see tag for placement)
Element 19 - C/P and re-size 40%. Move to bottom left corner of tag in front of element 18.
(see tag for placement)
Element 67 - C/P and re-size 40%. Move to bottom left corner in front of element 19.
(see tag for placement)
Element 86 - C/P and re-size 40%. Move to bottom left corner of tag in front of element 67.
(see tag for placement)
Add drop shadow to layers of your choosing.
I used:
V & H 2
Opacity 70
Blur 7
Color Black
Now you can add name and © information. Save as .png and re-size if you wish.
I re-size before I save and add
name and © info.
Let me know what you think of
this tutorial.
Thursday 26 September 2013

This tutorial was written by me on September 26, 2013.
It was made out of my own creation and any similarity is purely coincidental.
I used PSPx2 but any version will do.
Artist: Aurthur Crowe
You can find this tube at Arthur Crowe's Factory HERE
Please Don't use this tube without a license.
Scrap Kit: Touchdown by MistyLynns Creations HERE
You can buy this kit at Arthur Crowe's Factory
Mask: WSL 84 HERE
Font: Collegiate Black FLF Font HERE
Here goes:
Let’s start
with the mask layer:
New Raster – 800 X 800.
Open Paper 12. Open mask and minimize.
SELECTIONS – SELECT ALL – Copy and paste Paper 12 into selection.
Go to LAYERS – NEW MASK LAYER – FROM IMAGE – SOURCE LUMINANCE - CHECKED – from menu, find WSL 84 – OK. Duplicate and merge down. Re-size 110%.
Let’s do the frame layer now:
Gonna do a few elements after frame layer:
Element 13 - C/P and move to the top of the frame.
(see tag for placement)
Element 12 - C/P and re-size 70%. Move to left side of frame.
(see tag for placement)
Element 17 - C/P and move to bottom left side of frame.
(see tag for placement)
Element 8 - C/P and re-size 55%. Move to bottom left side of tag.
(see tag for placement)
Element 10 - C/P and re-size 30%. Move to bottom left over element 8.
(see tag for placement)
New Raster – 800 X 800.
Open Paper 12. Open mask and minimize.
SELECTIONS – SELECT ALL – Copy and paste Paper 12 into selection.
Go to LAYERS – NEW MASK LAYER – FROM IMAGE – SOURCE LUMINANCE - CHECKED – from menu, find WSL 84 – OK. Duplicate and merge down. Re-size 110%.
Let’s do the frame layer now:
Element 21 – C/P and re-size 90%. Grab your magic wand. Click
in the middle of element.
SELECTIONS – MODIFY – EXPAND 8 PIXELS.
New Raster Layer. Move under frame layer. Open Paper 8.
Copy and paste into
selection. Keep selected.
Grab the version of tube you wish to use.
C/P and move it into position.
Go to SELECTIONS - INVERT - DELETE - SELECTIONS - INVERT.
Duplicate the tube layer. ADJUST – BLUR – GAUSSIAN BLUR – RADIUS 25 - OK
Change BLEND MODE of copy of tube layer to HARD LIGHT and go to original tube layer and change BLEND MODE to SCREEN.
(see tag for placements)
Element 6 - C/P and re-size 30%. Move up over paper but under frame.
(see tag for placements)
Element 3 - C/P and re-size 80%. Move up on paper layer.
(see tag for placements)
Element 4 - C/P and re-size 50%. Move left on paper layer.
(see tag for placements)
Element 5 - C/P and re-size 50%. Move left on paper layer but in font of element 4.
(see tag for placements)
Gonna do a few elements after frame layer:
Element 13 - C/P and move to the top of the frame.
(see tag for placement)
Element 12 - C/P and re-size 70%. Move to left side of frame.
(see tag for placement)
Element 17 - C/P and move to bottom left side of frame.
(see tag for placement)
Element 8 - C/P and re-size 55%. Move to bottom left side of tag.
(see tag for placement)
Element 10 - C/P and re-size 30%. Move to bottom left over element 8.
(see tag for placement)
Element 2 – C/P and re-size 45%. Move to bottom left side of tag but right of element 8.
(see tag for placement)
Element 23 – C/P and re-size 30%. Move to bottom left corner of tag.
(see tag for placement)
Element 23 – C/P and re-size 30%. Move to bottom left corner of tag.
(see tag for placement)
Element 20 – C/P and re-size 30%. Move to bottom left but to the right of element 23.
(see tag for placement)
Element 1 – C/P and re-size 30%. Move to bottom left but to the right of element 20.
(see tag for placement)
Element 27 - C/P and re-size 30%. Move to bottom left side but to the right of element 1.
(see tag for placement)
Element 28 - C/P and re-size 30%. Move to bottom left side but to the right of element 27.
(see tag for placement)
(see tag for placement)
Element 27 - C/P and re-size 30%. Move to bottom left side but to the right of element 1.
(see tag for placement)
Element 28 - C/P and re-size 30%. Move to bottom left side but to the right of element 27.
(see tag for placement)
I place the tube layer here:
If you are using the same tube(s) as me, grab the version you want now. C/P and re-size 60%. Move to bottom right corner.
(see tag for placement)
Add drop shadow to layers of your
choosing.
I used
V & H 2
Opacity 70
Blur 7
Color Black
Now you can add name and © information. Save as .png and re-size if you wish.
Now you can add name and © information. Save as .png and re-size if you wish.
I re-size before I save and add
name and © info.
Let me know what you think of
this tutorial.
Subscribe to:
Posts
(Atom)