Friday 21 February 2014
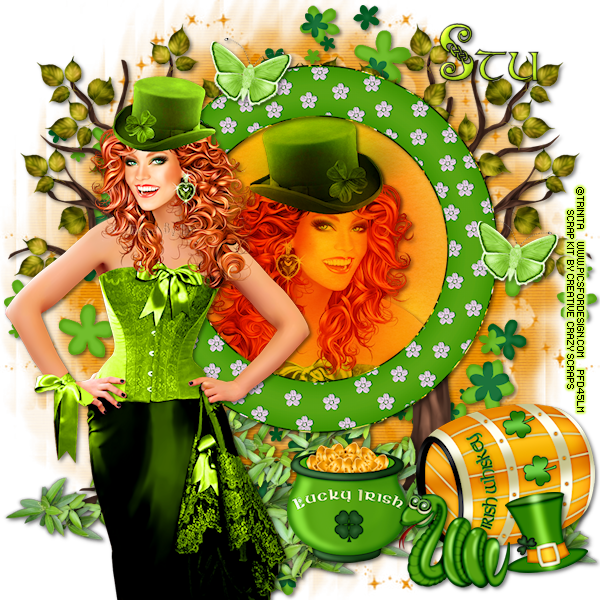
This tutorial was written by me on February 21, 2014.
It was made out of my own creation and any similarity is purely coincidental.
I used PSPx2 but any version will do.
Artist: Trinita
You can find this tube at Pics For Designs HERE
Please Don't use this tube without a license.
Scrap Kit: Leaping Leprechauns by Creative Crazy Scraps
You can find this kit at the Creative Crazy Scraps HERE
Mask: TBT St. Patty's Mask 1 HERE
Here goes:
Let’s start
with the mask layer:
New Raster – 800 X 800.
Open Pap 8. Open mask (TBT St. Patty's Mask 1) and minimize.
SELECTIONS – SELECT ALL – Copy and paste P10 into selection.
Go to LAYERS – NEW MASK LAYER – FROM IMAGE – SOURCE LUMINANCE - CHECKED – from menu, find TBT St. Patty's Mask 1 – OK. Duplicate and merge down. Re-size 105%.
This will be the frame layer:
Element 38 – C/P and re-size 80%. Move it up and a bit to the right. Make sure your frame layer is still highlighted. Grab your magic wand. Click in the middle of frame. SELECTIONS - MODIFY - EXPAND 8 pixels.
NEW RASTER LAYER - C/Paste into selection Pap 12. Keep selected.
Now grab the tube you are using. If you are using the same one as me, mirror her and then C/P and move her into position.
SELECTIONS - INVERT - DELETE - SELECTIONS - INVERT.
Duplicate the tube layer.
ADJUST – BLUR – GAUSSIAN BLUR – RADIUS 25 - OK.
Change BLEND MODE of copy of tube layer to HARD LIGHT and change the original tube layer to MULTIPLY.
(see tag for placement)
Some elements now:
Element 28 - C/P and move to top left corner of tag. Duplicate and mirror then flip. Make sure this layer is UNDER all frame layers.
(see tag for placement)
Element 37 - C/P and move to left side of tag. Duplicate and mirror then flip. Make sure this layer is UNDER all frame layers.
(see tag for placement)
Element 17 - C/P and move to bottom middle of tag. Make sure this layer is UNDER all frame layers.
(see tag for placement)
Element 14 - C/P and re-size 60%. Move to bottom right corner of tag. Make sure this layer if OVER all frame layers. All other layers will be over this one also.
(see tag for placement)
Element 8 - C/P and re-size 60%. Move to bottom right side of tag beside element 14.
(see tag for placement)
Element 1 - C/P and re-size 40%. Move to bottom right corner of tag if front of element 14..
(see tag for placement)
Element 35 - C/P and re-size 60%. Move to bottom right side of tag in front of elements 14 & 8.
(see tag for placement)
Element 18 - C/P and re-size 40%. Move to middle right side on frame. Duplicate and move copy up and over to top left on frame.
(see tag for placement)
I place the tube layer here:
If you are using the same tube as me, grab it now. C/P and re-size 50%. Move to far left corner of tag of tag.
(see tag for placement)
Add drop shadow to layers of your
choosing.
I used
V & H 2
Opacity 70
Blur 7
Color Black
Now you can add name
and © information. Save as .png and re-size if you wish.
I re-size before I save and add
name and © info.
Let me know what you think of
this tutorial.
Thursday 20 February 2014

This tutorial was written by me on February 20, 2014.
It was made out of my own creation and any similarity is purely coincidental.
I used PSPx2 but any version will do.
Artist: Anna Marine
You can find this tube at Creative Design Outlet HERE
Please Don't use this tube without a license.
Scrap Kit: Scraphonored IB - Anna Marine - 43-1
You can find this kit at the Creative Design Outlet HERE
Mask: WSL 84 HERE
Here goes:
Let’s start
with the mask layer:
New Raster – 800 X 800.
Open P10. Open mask (WSL 84) and minimize.
SELECTIONS – SELECT ALL – Copy and paste P10 into selection.
Go to LAYERS – NEW MASK LAYER – FROM IMAGE – SOURCE LUMINANCE - CHECKED – from menu, find WSL 84 – OK. Duplicate and merge down. Re-size 115%.
This will be the frame layer:
Frame 1 – C/P and move it up and a bit to the right. Make sure your frame layer is still highlighted. Grab your magic wand. Click in the middle of frame. SELECTIONS - MODIFY - EXPAND 8 pixels.
NEW RASTER LAYER - C/Paste into selection Paper 4. Keep selected.
Now grab the tube you are using. If you are using the same one as me, grab the CU now. C/P and move her into position.
SELECTIONS - INVERT - DELETE - SELECTIONS - INVERT.
Duplicate the tube layer.
ADJUST – BLUR – GAUSSIAN BLUR – RADIUS 25 - OK.
Change BLEND MODE of copy of tube layer to HARD LIGHT and change the original tube layer to DODGE.
(see tag for placement)
Some elements now:
Element 10 - C/P and move to top left corner of tag. Duplicate and mirror then flip. Make sure this layer is UNDER all frame layers.
(see tag for placement)
Element 11 - C/P and move to top left corner of tag. Duplicate and mirror then flip. Make sure this layer is UNDER all frame layers.
(see tag for placement)
Element 6 - C/P and move to top right corner of tag. Duplicate and mirror then flip. Move the copy up and a bit right. Make sure this layer is UNDER all frame layers.
(see tag for placement)
Element 8 - C/P and re-size 70%. Move to bottom right corner of tag. Make sure this layer if OVER all frame layers. All other layers will be over this one also.
(see tag for placement)
Element 18 - C/P and re-size 30%. Move to bottom right side of tag over element 8.
(see tag for placement)
Element 5 - C/P and re-size 40%. Move to top middle over frame.
(see tag for placement)
Element 9 - C/P and re-size 40%. Move to top right side of tag.
(see tag for placement)
Element 1 - C/P and move to top left side of tag.
(see tag for placement)
Wordart - C/P and re-size 35%. Move to bottom part of element 8.
(see tag for placement)
I place the tube layer here:
If you are using the same tube as me, grab it now. C/P and mirror her. Move to far left corner of tag of tag. Now grab the lady bug from the tube. C/P and move to middle and a bit right on tag.
(see tag for placement)
Add drop shadow to layers of your
choosing.
I used
V & H 2
Opacity 70
Blur 7
Color Black
Now you can add name
and © information. Save as .png and re-size if you wish.
I re-size before I save and add
name and © info.
Let me know what you think of
this tutorial.
Tuesday 18 February 2014

This tutorial was written by me on February 18, 2014.
It was made out of my own creation and any similarity is purely coincidental.
I used PSPx2 but any version will do.
Artist: Verymany
You can find this tube at the Verymany Tubes HERE
Please Don't use this tube without a license.
Scrap Kit: O' Alice by Scrappin with Lil Ole Me
You can find this kit at the Scraps From The Heart HERE
Mask: WSL 84 HERE
Here goes:
Let’s start
with the mask layer:
New Raster – 800 X 800.
Open P10. Open mask (WSL 84) and minimize.
SELECTIONS – SELECT ALL – Copy and paste P10 into selection.
Go to LAYERS – NEW MASK LAYER – FROM IMAGE – SOURCE LUMINANCE - CHECKED – from menu, find WSL 84 – OK. Duplicate and merge down. Re-size 115%.
This will be the frame layer:
Element 88 – C/P and re-size 75%. Leave it where it lands. Make sure your frame layer is still highlighted. Grab your magic wand. Click in the middle of frame. SELECTIONS - MODIFY - EXPAND 2 pixels - INVERT.
NEW RASTER LAYER - C/Paste into selection P9. Keep selected.
Now grab the tube you are using. If you are using the same one as me, grab the CU now. C/P and re-size 70%. Move her into position.
SELECTIONS - INVERT - DELETE - SELECTIONS - INVERT.
Duplicate the tube layer.
ADJUST – BLUR – GAUSSIAN BLUR – RADIUS 25 - OK.
Change BLEND MODE of copy of tube layer to HARD LIGHT and change the original tube layer to MULTIPLY.
(see tag for placement)
Some elements now:
Element 20 - C/P and move to top left corner of tag. Duplicate, mirror and flip. Make sure this layer is UNDER all frame layers.
(see tag for placement)
Element 55 - C/P and move to left side of frame. Duplicate and mirror. Make sure this layer is UNDER all frame layers.
(see tag for placement)
Element 18 - C/P and re-size 40%. Move to top right corner of frame. This and all the rest of the element(s) will be OVER the frame layers.
(see tag for placement)
Element 71 - C/P and re-size 90%. Move to left side of frame.
(see tag for placement)
Element 49 - C/P and re-size 50%. Move to bottom right side of frame.
(see tag for placement)
Element 58 - C/P and re-size 50%. Move to bottom left corner of frame. Duplicate and mirror.
(see tag for placement)
Element 113 - C/P and re-size 30%. Move to bottom middle of frame.
(see tag for placement)
Element 13 - C/P and re-size 45%. Move to bottom right corner of tag beside element 113.
(see tag for placement)
I place the tube layer here:
If you are using the same tube as me, grab it now. C/P and mirror her. Move to far left corner of tag.
(see tag for placement)
Add drop shadow to layers of your
choosing.
I used
V & H 2
Opacity 70
Blur 7
Color Black
Now you can add name
and © information. Save as .png and re-size if you wish.
I re-size before I save and add
name and © info.
Let me know what you think of
this tutorial.
Tuesday 11 February 2014


Saturday 8 February 2014

This tutorial was written by me on February 8, 2014.
It was made out of my own creation and any similarity is purely coincidental.
I used PSPx2 but any version will do.
Artist: PinUp Toons
You can find this tube at Creative Design Outlet HERE
Please Don't use this tube without a license.
Scrap Kit: Scrap TK IB Amy Matthews - Feb. 2012 - BT
by Tammy Kat Dezigns
You can find this kit at Creative Design Outlet HERE
Mask: WSL 84 HERE
Here goes:
New Raster – 800 X 800.
Open Paper 2. Open mask (WSL 84) and minimize.
SELECTIONS – SELECT ALL – Copy and paste Paper 2 into selection.
Go to LAYERS – NEW MASK LAYER – FROM IMAGE – SOURCE LUMINANCE - CHECKED – from menu, find WSL 84 – OK. Duplicate and merge down. Re-size 115%
Frame 1 - C/P and re-size 80%. Leave it where it lands.
Grab your magic wand. Click in the middle of the frame layer.
Go to SELECTIONS - MODIFY - EXPAND 8 PIXELS - INVERT.
Open New Raster Layer. C/Paste into selection Paper 6.
Keep selected.
Now grab the tube you are using. If you are using the same one as me, grab the CU now. C/P and mirror and move her into position.
SELECTIONS - INVERT - DELETE - SELECTIONS - INVERT.
Duplicate the tube layer.
ADJUST – BLUR – GAUSSIAN BLUR – RADIUS 25 - OK.
Change BLEND MODE of copy of tube layer to HARD LIGHT and change the original tube layer to MULTIPLY.
(see tag for placement)
Lets do some elements now:
Element 15 - C/P and move to top left corner of tag. Duplicate and mirror then flip. Make sure these layers are UNDER the frame layers.
(see tag for placement)
Element 6 - C/P and re-size 65%. Move to bottom of frame. Duplicate and mirror. Grab your eraser tool and erase the parts that are over the diamond circles. Make sure this layer is OVER the frame layer.
(see tag for placement)
Element 5 - C/P and re-size 50%. Move to bottom of frame beside diamond circle. Duplicate and move over to the right side.
(see tag for placement)
Element 4 - C/P and re-size 50%. Move to bottom middle of frame on top of element and copy of element 5.
(see tag for placement)
Element 18 - C/P and re-size 70%. Move to top right corner of frame.
(see tag for placement)
Element 10a - C/P and re-size 85%. Move to bottom of element 18.
(see tag for placement)
Element 11 - C/P and move to top left side of tag. Duplicate and move copy over to right side of frame.
(see tag for placement)
Wordart - C/P and move to top of tag, then a bit to the right.
(see tag for placement)
Now for the tube(s):
If you are using the same tube as me, re-size whole tag from 800 X 800 to 600 X 600. C/P and mirror tube. Move her to the far left side of tag.
(see tag for placement)
Add drop shadow to layers of your choosing.
I used:
V & H 2
Opacity 70
Blur 7
Color Black
Now you can add name and © information.
Save as .png and re-size if you wish.
Save and add
name and © info.
Let me know what you think of
this tutorial.
Friday 7 February 2014

This tutorial was written by me on February 7, 2014.
It was made out of my own creation and any similarity is purely coincidental.
I used PSPx2 but any version will do.
Artist: Amy Matthews
You can find this tube at Creative Design Outlet HERE
Please Don't use this tube without a license.
Scrap Kit: IB Scrap Kit Amy Matthews Individual Tube 19-2
by Ladyhawwk Designs
You can find this kit at Creative Design Outlet HERE
Mask: WSL 84 HERE
Here goes:
New Raster – 800 X 800.
Open Paper 3. Open mask (WSL 84) and minimize.
SELECTIONS – SELECT ALL – Copy and paste Paper 3 into selection.
Go to LAYERS – NEW MASK LAYER – FROM IMAGE – SOURCE LUMINANCE - CHECKED – from menu, find WSL 84 – OK. Duplicate and merge down. Re-size 115%
Frame 1 - C/P and re-size 80%. Leave it where it lands.
Grab your magic wand. Click in the middle of the frame layer.
Go to SELECTIONS - MODIFY - EXPAND 8 PIXELS - INVERT.
Open New Raster Layer. C/Paste into selection Paper 6.
Keep selected.
Now grab the tube you are using. If you are using the same one as me, grab the CU now. C/P and mirror and move her into position.
SELECTIONS - INVERT - DELETE - SELECTIONS - INVERT.
Duplicate the tube layer.
ADJUST – BLUR – GAUSSIAN BLUR – RADIUS 25 - OK.
Change BLEND MODE of copy of tube layer to HARD LIGHT and change the original tube layer to LUMINANCE (L). Reduce OPACITY to 75%.
(see tag for placement)
Lets do some elements now:
Wordart - C/P and leave where it lands. Make sure it is UNDER the frame layers. Used the same settings as bellow, but for the color I used white and then I did it a second time and changed the V&H to -2. Then I did a regular drop shadow with color black.
(see tag for placement)
Element 17 - C/P and re-size 80%. Move to the right side of tag. Duplicate and mirror. Make sure these layers are UNDER the frame layers.
(see tag for placement)
Element 16 - C/P and re-size 50%. Move to top left corner of frame. Duplicate and mirror. Make sure this layer is OVER the frame layer.
(see tag for placement)
Element 14 - C/P and re-size 40%. Move to top left corner of frame over element 16. Duplicate and mirror.
(see tag for placement)
Element 11 - C/P and re-size 60%. Move to bottom right side of frame. Duplicate and mirror.
(see tag for placement)
Element 22 - C/P and re-size 40%. Move to bottom right side of tag.
(see tag for placement)
Element 10 - C/P and re-size 30%. Move to bottom right side of tag in beside element 22.
(see tag for placement)
Element 24 - C/P and re-size 40%. Move to bottom middle of frame.
(see tag for placement)
Now for the tube(s):
If you are using the same tube as me, grab the full size tube now. C/P and move her to the far left side of tag.
(see tag for placement)
Add drop shadow to layers of your choosing.
I used:
V & H 2
Opacity 70
Blur 7
Color Black
Now you can add name and © information.
Save as .png and re-size if you wish.
Save and add
name and © info.
Let me know what you think of
this tutorial.
Subscribe to:
Posts
(Atom)