Monday 29 September 2014

PTU Moon Child
This tutorial was written by me on September 29, 2014.
It was made out of my own creation and any similarity is purely
coincidental.
I used PSP X6 but any version would work.
Artist: Amy Brown
I bought this tube at Creative Design Outlet HERE
Do not use this tube
unless you have a license.
Scrap Kit: ScrapWDD_IB-AmyBrown-47-2
You can find this kit by WDDesignz at Creative Design Outlet HERE
You can find this kit by WDDesignz at Creative Design Outlet HERE
Mask: WSL 84 HERE
Let’s start with the mask layer:
New Raster – 800 X 800.
Open Paper 2. Open mask (WSL 84) and minimize.
SELECTIONS – SELECT ALL – Copy and paste Paper 2 into selection.
Go to LAYERS – NEW MASK LAYER – FROM IMAGE – SOURCE LUMINANCE - CHECKED – from menu, find WSL 84 – OK. Duplicate and merge down.
Re-size 115%.
(see tag for placement)
Now onto some elements:
Element 19 - C/P and move to bottom left side of tag. Make sure this layer is UNDER the frame layer(s). Duplicate and mirror.
Element 4 - C/P and leave in the middle of tag. Make sure this layer is also UNDER the frame layer(s).
Element 7 - C/P and move to bottom right corner of tag. Duplicate and mirror.
If you use the same tube as me, C/P it now. Mirror and move her to the bottom of frame. Copy and then move the original under the wordart (element 24) and make sure the copy is over the wordart. Move to the Element 24 layer - then go to SELECTIONS - SELECT ALL - FLOAT - DE-FLOAT.
(see tag for placement)
Add drop shadow to layers of your
choosing.
I've used
V & H 2
Opacity 70
Blur 7
Color Black
Now you can add name
and © information. Save as .png and re-size if you wish.
I re-size before I add
name and © info and then save.
Let me know what you think of
this tutorial.
Saturday 27 September 2014
This tutorial was written by me on September 27, 2014.
It was made out of my own creation and any similarity is purely coincidental.
I used PSP X2 but any version will do.
Artist:Unholy Vault Designs
I bought mine when they were selling at PTE.
Unholy Vault is not selling tubes anymore.
Here goes:
Element 55 - C/P and move to upper left corner of tag. Duplicate and mirror.
(see tag for placement)
Element 121 - C/P and leave it where it lands.
(see tag for placement)
Element 58 - C/P and re-size 40%. Move to top left corner of tag.
(see tag for placement)
Element 70 - C/P and re-size 75%. Move to top left corner of tag. Duplicate and mirror.
(see tag for placement)
Element 64 - C/P and leave it where it lands.
(see tag for placement)
Element 38 - C/P and re-size 40%. Move to middle of element 64.
(see tag for placement)
Element 59 - C/P and re-size 30%. Move to middle but a little bit up over element 38.
(see tag for placement)
Element 72 - C/P and move to top middle of tag.
(see tag for placement)
Element 67 - C/P and re-size 75%. Move to bottom left side of tag. Duplicate and mirror.
(see tag for placement)
Element 63 - C/P and re-size 75%. Move to right side of original of element 67. Duplicate and mirror.
(see tag for placement)
Element 66 - C/P and re-size 75%. Move to left side of original of element 63. Duplicate and mirror.
(see tag for placement)
Now for the tube(s):
So now I am gonna be a tad different. What I did here is re-size the whole tag before I paste the tube. OK... make the changes as you see them in the image below.

Now, if you are using the same tube as me, grab the full size version now. C/P and move her down to the bottom, but a bit to the right on the tag.
(see tag for placement)
I used:
V & H 2
Opacity 70
Blur 7
Color Black
Now you can add name and © information. Save as .png and re-size if you wish.
(see tag for placement)
Element 121 - C/P and leave it where it lands.
(see tag for placement)
Element 58 - C/P and re-size 40%. Move to top left corner of tag.
(see tag for placement)
Element 70 - C/P and re-size 75%. Move to top left corner of tag. Duplicate and mirror.
(see tag for placement)
Element 64 - C/P and leave it where it lands.
(see tag for placement)
Element 38 - C/P and re-size 40%. Move to middle of element 64.
(see tag for placement)
Element 59 - C/P and re-size 30%. Move to middle but a little bit up over element 38.
(see tag for placement)
Element 72 - C/P and move to top middle of tag.
(see tag for placement)
Element 67 - C/P and re-size 75%. Move to bottom left side of tag. Duplicate and mirror.
(see tag for placement)
Element 63 - C/P and re-size 75%. Move to right side of original of element 67. Duplicate and mirror.
(see tag for placement)
Element 66 - C/P and re-size 75%. Move to left side of original of element 63. Duplicate and mirror.
(see tag for placement)
Now for the tube(s):
So now I am gonna be a tad different. What I did here is re-size the whole tag before I paste the tube. OK... make the changes as you see them in the image below.
Now, if you are using the same tube as me, grab the full size version now. C/P and move her down to the bottom, but a bit to the right on the tag.
(see tag for placement)
I used:
V & H 2
Opacity 70
Blur 7
Color Black
Now you can add name and © information. Save as .png and re-size if you wish.
Save and add
name and © info.
Let me know what you think of
this tutorial.
I would love to see any results.
Thursday 25 September 2014

PTU Insane Asylum
This tutorial was written by me on September 25, 2014.
It was made out of my own creation and any similarity is purely
coincidental.
I used PSP X6 but any version would work.
Artist: Enamorte
I bought this tube at Creative Design Outlet HERE
Do not use this tube
unless you have a license.
Mask: WSL 84 HERE
Let’s start with the mask layer:
New Raster – 800 X 800.
Open Paper 3. Open mask (WSL 84) and minimize.
SELECTIONS – SELECT ALL – Copy and paste Paper 3 into selection.
Go to LAYERS – NEW MASK LAYER – FROM IMAGE – SOURCE LUMINANCE - CHECKED – from menu, find WSL 84 – OK. Duplicate and merge down.
Re-size 115%.
(see tag for placement)
Now onto some elements:
Element 18 - C/P and resize 60%. Move to top left corner of tag. Make sure this layer is UNDER the frame layer(s).
Element 50 - C/P and re-size 75%. Move to far right side of tag. Make sure this layer is also UNDER the frame layer(s). Duplicate and mirror.
Element 44 - C/P and re-size 60%. Move to top middle of frame. Make sure this layer, and all other layer(s), are OVER the frame layer(s).
If you are using the same tube as me.
(see tag for placement)
Add drop shadow to layers of your
choosing.
I've used
V & H 2
Opacity 70
Blur 7
Color Black
Now you can add name
and © information. Save as .png and re-size if you wish.
I re-size before I add
name and © info and then save.
Let me know what you think of
this tutorial.
Friday 19 September 2014


Tuesday 16 September 2014

PTU Happy Helloween
This tutorial was written by me on September 16, 2014.
It was made out of my own creation and any similarity is purely
coincidental.
I used PSP X6 but any version would work.
Artist: Alehandra Vanhek
I bought this tube at Pics For Design HERE
Do not use this tube
unless you have a license.
Mask: WSL 287 HERE
Let’s start with the mask layer:
New Raster – 800 X 800.
Open Paper 7. Open mask (WSL 287) and minimize.
SELECTIONS – SELECT ALL – Copy and paste Paper 7 into selection.
Go to LAYERS – NEW MASK LAYER – FROM IMAGE – SOURCE LUMINANCE - CHECKED – from menu, find WSL 287 – OK. Duplicate and merge down.
Re-size 115%.
(see tag for placement)
Now onto some elements:
Element 118 - C/P and resize 75%. Move to top middle of tag. Make sure this layer is UNDER the frame layer(s).
Element 42 - C/P and move to bottom middle of tag. This layer is also UNDER the frame layer(s).
Element 54 - C/P and re-size 60%. Move to lower left side of tag in front of element 100. Duplicate and mirror. This layer is also UNDER the frame layer(s).
(see tag for placement)
If you are using the same tube as me. C/P and re-size 45%. Mirror and move to bottom right corner of tag.
(see tag for placement)
Add drop shadow to layers of your
choosing.
I've used
V & H 2
Opacity 70
Blur 7
Color Black
Now you can add name
and © information. Save as .png and re-size if you wish.
I re-size before I add
name and © info and then save.
Let me know what you think of
this tutorial.
Monday 15 September 2014

Thank you so very much Rita, I am so honored! ♥
I am now going to pass this award on to 5 people who rawk my world through their designing, tagging and being the
wonderful people and friends that they are. Check out these awesome blogs...
Cindy from Scrappin With Lil Ole Me
Sheila from Devilish Dezines
Millie from Millie's PSP Madness
Alison from Hungry Hill
If you have received this award, please place it proudly on your blog , and then pass the award on to 5 people of your choosing!

Sunday 14 September 2014
This tutorial was written by me on September 14, 2014.
It was made out of my own creation and any similarity is purely coincidental.
I used PSPx6 but any version will do.
Artist: Enys Guerrero
You can find this tube at Creative Design Outlet HERE
Scrap Kit: ScrapRD_IB-EnysGuerrero-12-1 By Rebel Dezines
You can buy this kit at Creative Design Outlet HERE
Mask: WSL 59 HERE
Here goes:
New Raster – 800 X 800.
Open Paper 1. Open mask (WSL 59) and minimize.
SELECTIONS – SELECT ALL – Copy and paste Paper 1 into selection.
Go to LAYERS – NEW MASK LAYER – FROM IMAGE – SOURCE LUMINANCE - CHECKED – from menu, find WSL 59 – OK. Duplicate and merge down. Re-size 105%.
Now for the frame:
Frame 1 - C/P and move a bit down, but keep in the middle of tag. Make sure your frame layer is still highlighted. Grab your magic wand. Click in the middle of frame. SELECTIONS - MODIFY - EXPAND 8 pixels.
NEW RASTER LAYER - C/Paste into selection Paper 3. Keep selected.
If you are using the same tube as me, grab it now. C/P over frame and then move her into position. Duplicate and move the copy under frame but over paper layer. SELECTIONS - INVERT - DELETE - SELECTIONS - INVERT - SELECTIONS - SELECT NONE.
Grab your selection tool (same place as magic wand) and create a square around the bottom of original tube layer. Grab the eraser tool now. Erase the parts of tube you don't want. SELECTIONS - SELECT NONE.
(see tag for placement)
Lets do some elements now:
Element 7 - C/P and re-size 60%. Move to top right side of tag. Make sure this layer is UNDER the frame layer and original tube layer.
(see tag for placement)
Element 13 - C/P and move to top left corner of tag. Make sure this layer is UNDER the frame layer and original tube layer.
(see tag for placement)
Element 18 - C/P and re-size 40%. Move this to the bottom left side of frame. Make sure this and all other layer(s) are OVER the frame layer. Move down and out a bit to the left of original. Merge down, then duplicate and mirror.
(see tag for placement)
Element 12 - C/P and re-size 60%. Move to bottom left corner of frame in front of element 18.
(see tag for placement)
Element 1 - C/P and re-size 40%. Move to bottom middle of frame.
(see tag for placement)
Element 19 - C/P and re-size 40%. Move to bottom left corner of frame in front of copy of element 18.
(see tag for placement)
Element 2 - C/P and re-size 40%. Move to upper right corner of frame.
(see tag for placement)
Word Art - C/P and re-size 50%. Move to bottom middle of tag over all layers.
(see tag for placement)
Add drop shadow to layers of your choosing.
I used:
V & H 2
Opacity 70
Blur 7
Color Black
Now you can add name and © information. Save as .png and re-size if you wish.
Add drop shadow to layers of your choosing.
I used:
V & H 2
Opacity 70
Blur 7
Color Black
Now you can add name and © information. Save as .png and re-size if you wish.
I re-size before I save and add
name and © info.
Let me know what you think of
this tutorial.
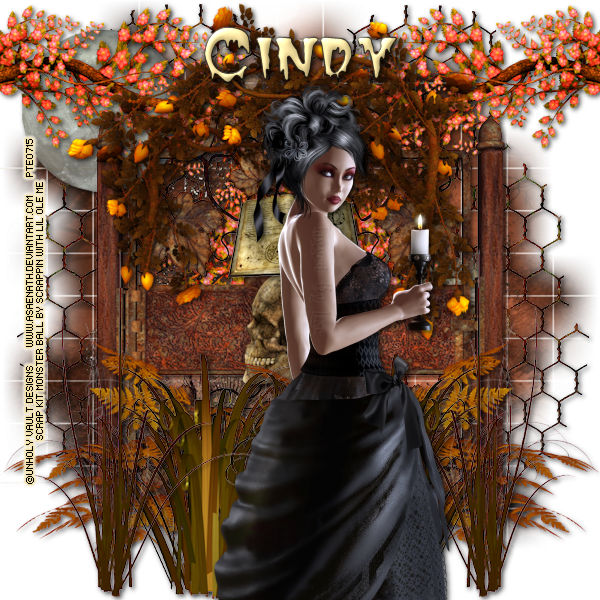
Saturday 13 September 2014
So I was not feeling the tutorials today.... LOL Instead, I did some tags for Sweet Cindy @ Scrappin With Lil Ole Me. I hope you like these. I had so much fun creating them.


Subscribe to:
Posts
(Atom)