Friday, 23 May 2014

This tutorial was written by me on May 23, 2014.
It was made out of my own creation and any similarity is purely coincidental.
I used PSPx2 but any version will do.
Artist: Enys Guerrero
You can find this tube at Creative Design Outlet HERE
Please Don't use this tube without a license.
Scrap Kit: ScrapRD_IB-EnysGuerrero-12-3
You can find this kit by Rebel Dezines at the Creative Design Outlet HERE
Mask: WSL 84 HERE
Here goes:
Let’s start
with the mask layer:
New Raster – 800 X 800.
Open Paper 4. Open mask (WSL 84) and minimize.
SELECTIONS – SELECT ALL – Copy and paste Paper 4 into selection.
Go to LAYERS – NEW MASK LAYER – FROM IMAGE – SOURCE LUMINANCE - CHECKED – from menu, find WSL 7 – OK. Duplicate and merge down. Re-size 115%.
Lets start with these elements:
Element 11 – C/P and leave it where it lands.
Element 19 - C/P and leave it in the middle of element 11.
Make sure element 11 is again highlighted. Grab your magic wand.
Click anywhere outside of element 11.
Now grab the tube you are using. If you are using the same one(s) as me, grab it now. Move her into position. Go back to tube and mirror. C/P and move copy into position. Merge down both tubes. Duplicate. Go to ADJUST – BLUR – GAUSSIAN BLUR – RADIUS 25 - OK.
Change BLEND MODE of copy of tube layer to HARD LIGHT and leave the original tube layer on SCREEN.
(see tag for placement)
Now for some more elements:
Element 13 - C/P and re-size 50%. Move to top right corner of tag.
(see tag for placement)
Element 12 - C/P and leave it where it lands.
(see tag for placement)
Element 7 - C/P and move to far left side of tag. Duplicate and mirror.
(see tag for placement)
Word Art 1 - C/P and re-size 85%. Move down a little bit and to the left side of tag. Now I did a drop shadow as described below except for the color, I used white.
(see tag for placement)
Element 20 - C/P and re-size 50%. Move to bottom left side of tag.
(see tag for placement)
Element 3 - C/P and re-size 30%. Move to bottom left side over element 20.
(see tag for placement)
Element 5 - C/P and re-size 50%. Move to bottom left side of tag, but on the right side of element(s) 20 and 3
(see tag for placement)
Element 1 - C/P and re-size 30%. Move to bottom and a bit to right side of tag.
(see tag for placement)
Element 17 - C/P and re-size 30%. Move to bottom right side of tag.
(see tag for placement)
Element 16 - C/P and re-size 50%. Mirror and move to far right side of tag.
(see tag for placement)
I place the tube layer(s) here:
I did something just a tad different here. The tube is small for the tag, so I re-size it from 800 X 800 to 600 X600. Remember to check RE-SIZE ALL LAYERS. Then I grab the version I like of this tube and paste her in the middle of the tag. Maybe move her down just a bit.
(see tag for placement)
Add drop shadow to layers of your
choosing.
I used
V & H 2
Opacity 70
Blur 7
Color Black
Now you can add name
and © information. Save as .png and re-size if you wish.
I re-size before I save and add
name and © info.
Let me know what you think of
this tutorial.
Saturday, 17 May 2014
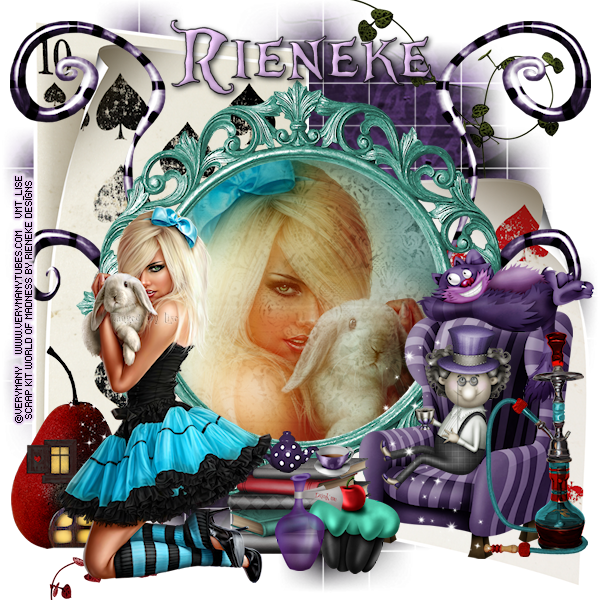
This tutorial was written by me on May 17, 2014.
It was made out of my own creation and any similarity is purely coincidental.
I used PSPx2 but any version will do.
Artist: Verymany
You can find this tube at Verymany Tubes Store HERE
Please Don't use this tube without a license.
Scrap Kit: World Of Madness by Rieneke Designs
You can find this kit at the Twilight Scraps HERE
Mask: WSL 84 HERE
Here goes:
Let’s start
with the mask layer:
New Raster – 800 X 800.
Open Paper 7. Open mask (WSL 84) and minimize.
SELECTIONS – SELECT ALL – Copy and paste Paper 7 into selection.
Go to LAYERS – NEW MASK LAYER – FROM IMAGE – SOURCE LUMINANCE - CHECKED – from menu, find WSL 84 – OK. Duplicate and merge down. Re-size 115%.
This will be the frame layer:
Element 62 – C/P and leave it where it lands. Make sure your frame layer is still highlighted. Grab your magic wand. Click in the middle of frame. SELECTIONS - MODIFY - EXPAND 8 pixels.
NEW RASTER LAYER - C/Paste into selection Paper 3. Keep selected.
Now grab the tube you are using. If you are using the same one(s) as me, grab it now. C/P and mirror and move her into position.
SELECTIONS - INVERT - DELETE - SELECTIONS - INVERT.
Duplicate the tube layer.
ADJUST – BLUR – GAUSSIAN BLUR – RADIUS 25 - OK.
Change BLEND MODE of copy of tube layer to HARD LIGHT and change the original tube layer to MULTIPLY.
(see tag for placement)
Some elements now:
Element 34 - C/P and move to right side of tag. Make sure this layer is UNDER all frame layer(s).
(see tag for placement)
Element 35 - C/P and move to left side of tag. This layer will also be UNDER all frame layer(s).
(see tag for placement)
Element 2 - C/P and move to left side of tag. This layer is also UNDER the frame layer(s),
(see tag for placement)
Element 27 - C/P and move to right side of tag. This layer is also UNDER the frame layer(s).
(see tag for placement)
Element 102 - C/P and move to left side of tag. Make sure this layer will also be UNDER the frame layer(s). Duplicate and mirror.
(see tag for placement)
Element 93 - C/P and re-size 60%. Move to bottom right corner of tag. Make sure this layer is OVER all frame layer(s). All other layer(s) will be OVER the frame layer(s).
(see tag for placement)
Element 15 - C/P and re-size 40%. Move to right side of tag over element 93.
(see tag for placement)
Element 98 - C/P and re-size 40%. Move to right side of tag over element 93 but under element 15.
(see tag for placement)
Element 65 - C/P and re-size 40%. Move to bottom middle of tag.
(see tag for placement)
Element 66 - C/P and and re-size 10%. Move over element 65.
(see tag for placement)
Element 4 - C/P and re-size 15%. Move over element 65 and beside element 66.
(see tag for placement)
Element 20 - C/P and re-size 50%. Mirror and move to far left corner of tag beside element 93.
(see tag for placement)
Element 11 - C/P and re-size 25%. Move to bottom middle but to the right side of element 93.
(see tag for placement)
Element 8 - C/P and re-size 25%. Move to bottom middle of tag to the right side of element 11.
(see tag for placement)
Element 51 - C/P and re-size 50%. Move to bottom right corner of tag.
(see tag for placement)
I place the tube layer(s) here:
If you are using the same tube as me. C/P and re-size her 45%. Move her to bottom left side of tag.
(see tag for placement)
Add drop shadow to layers of your
choosing.
I used
V & H 2
Opacity 70
Blur 7
Color Black
Now you can add name
and © information. Save as .png and re-size if you wish.
I re-size before I save and add
name and © info.
Let me know what you think of
this tutorial.
Friday, 16 May 2014

This tutorial was written by me on May 16, 2014.
It was made out of my own creation and any similarity is purely coincidental.
I used PSPx2 but any version will do.
Artist: Christ Ortega
You can find this tube at Spider's Soul HERE
This is a Free To Use Tube.
Scrap Kit: Summer Garden by Graphics Of Fantasy
You can buy this kit at Graphics Of Fantasy HERE
Mask: Mask: WSL 84 HERE
Here goes:
New Raster – 800 X 800.
Open Paper 7. Open mask (WSL 84) and minimize.
SELECTIONS – SELECT ALL – Copy and paste Paper 7 into selection.
Go to LAYERS – NEW MASK LAYER – FROM IMAGE – SOURCE LUMINANCE - CHECKED – from menu, find WSL 84 – OK. Duplicate and merge down. Re-size 115%.
Now for the frame:
Frame 3 - C/P and leave it where it lands. Make sure your frame layer is still highlighted. Grab your magic wand. Click in the middle of frame. SELECTIONS - MODIFY - EXPAND 8 pixels.
NEW RASTER LAYER - C/Paste into selection Paper 1. Grab Frame 6 and C/P re-size 70%. Move to top right corner of frame.
Keep selected.
Now grab the tube you are using. If you are using the same one as me, grab it now. C/P over paper layer and then move her into position.
SELECTIONS - INVERT - DELETE - SELECTIONS - INVERT - SELECTIONS - SELECT NONE.
Grab Element 120 - C/P and re-size to 10%. Move over hand on tube.
Grab Element 43. C/P and move a bit right on tag. Change opacity to SOFT LIGHT.
(see tag for placement)
Lets do some elements now:
Element 136 - C/P and move to top right corner of tag. Make sure this layer is UNDER the frame layer and original tube layer. Duplicate and mirror.
(see tag for placement)
Element 9 - C/P and move to top left corner of tag. Make sure this layer is also UNDER the frame layer. Duplicate and mirror.
(see tag for placement)
Element 126 - C/P and re-size 80%. Move to far left side of frame. Make sure this layer is OVER the frame layer. All other layers will now be OVER the frame layer(s).
(see tag for placement)
Element 28 - C/P and move to bottom right side of tag.
(see tag for placement)
Element 117 - C/P and re-size 7%. Move to bottom and a bit to the left on tag.
(see tag for placement)
Element 51 - C/P and move to bottom left side of tag.
(see tag for placement)
Add drop shadow to layers of your choosing.
I used:
V & H 2
Opacity 70
Blur 7
Color Black
Now you can add name and © information. Save as .png and re-size if you wish.
I re-size before I save and add
name and © info.
Let me know what you think of
this tutorial.
Tuesday, 13 May 2014

This tutorial was written by me on May 13, 2014.
It was made out of my own creation and any similarity is purely coincidental.
I used PSPx2 but any version will do.
Artist: Anna Marine
You can find this tube at Creative Design Outlet HERE
Please Don't use this tube without a license.
Scrap Kit: Scraphonored_IB-AnnaMarine-51-1
You can find this kit by Honored Scraps at the Creative Design Outlet HERE
Mask: MPM 7 HERE
Here goes:
Let’s start
with the mask layer:
New Raster – 800 X 800.
Open Paper 2. Open mask (MPM 7) and minimize.
SELECTIONS – SELECT ALL – Copy and paste Paper 2 into selection.
Go to LAYERS – NEW MASK LAYER – FROM IMAGE – SOURCE LUMINANCE - CHECKED – from menu, find MPM 7 – OK. Duplicate and merge down. Re-size 105%.
This will be the frame layer:
Frame 2 – C/P and re-size 70%. Move it down and a bit right on tag. Make sure your frame layer is still highlighted. Grab your magic wand. Click in the middle of frame. SELECTIONS - MODIFY - EXPAND 8 pixels.
NEW RASTER LAYER - C/Paste into selection Paper 4. Keep selected.
Now grab the tube you are using. If you are using the same one(s) as me, grab it now. I used the CU here. Move her into position.
SELECTIONS - INVERT - DELETE - SELECTIONS - INVERT.
Duplicate the tube layer.
ADJUST – BLUR – GAUSSIAN BLUR – RADIUS 25 - OK.
Change BLEND MODE of copy of tube layer to HARD LIGHT and leave the original tube layer on SCREEN.
(see tag for placement)
Some elements now:
Element 8 - C/P and move to top left corner of tag. Make sure this layer is UNDER the frame layer(s). Duplicate and mirror.
(see tag for placement)
Element 1 - C/P and to the lower right side of tag. Make sure this layer is also UNDER the frame layer(s). Duplicate and mirror.
(see tag for placement)
Element 20 - C/P and re-size 70%. Move to bottom middle of frame. Make sure this and all the rest of the layers are OVER the frame layer(s).
(see tag for placement)
Element 4 - C/P and re-size 70%. Move to bottom left side of frame. Duplicate and mirror.
(see tag for placement)
Word Art 1 - C/P and re-size 70%. Move to top middle of tag. Duplicate and on the original element layer, do a drop shadow as described below except for color, use white and do a second drop shadow but for V & H, use -2.
(see tag for placement)
I place the tube layer(s) here:
If you are using the same tube as me. C/P and move her to the far left side of frame. Duplicate and mirror.
(see tag for placement)
Add drop shadow to layers of your
choosing.
I used
V & H 2
Opacity 70
Blur 7
Color Black
Now you can add name
and © information. Save as .png and re-size if you wish.
I re-size before I save and add
name and © info.
Let me know what you think of
this tutorial.
Sunday, 11 May 2014

This tutorial was written by me on May 11, 2014.
It was made out of my own creation and any similarity is purely coincidental.
I used PSPx2 but any version will do.
Artist: Mashi
You can find this tube at Creative Design Outlet HERE
Please Don't use this tube without a license.
Scrap Kit: ScrapMonti_IB-Mashi-22-1
You can find this kit at the Creative Design Outlet HERE
Mask: MPM 38 HERE
Here goes:
Let’s start
with the mask layer:
New Raster – 800 X 800.
Open Paper 2. Open mask (MPM 38) and minimize.
SELECTIONS – SELECT ALL – Copy and paste Paper 2 into selection.
Go to LAYERS – NEW MASK LAYER – FROM IMAGE – SOURCE LUMINANCE - CHECKED – from menu, find MPM 38 – OK. Duplicate and merge down. Re-size 125%.
This will be the frame layer:
Frame 1 – C/P and re-size 70%. Move it down and a bit right on tag. Make sure your frame layer is still highlighted. Grab your magic wand. Click in the middle of frame. SELECTIONS - MODIFY - EXPAND 8 pixels.
NEW RASTER LAYER - C/Paste into selection Paper 5. Keep selected.
Now grab the tube you are using. If you are using the same one(s) as me, grab it now. I used the CU here. Move her into position.
SELECTIONS - INVERT - DELETE - SELECTIONS - INVERT.
Duplicate the tube layer.
ADJUST – BLUR – GAUSSIAN BLUR – RADIUS 25 - OK.
Change BLEND MODE of copy of tube layer to OVERLAY and leave the original tube layer on NORMAL.
(see tag for placement)
Some elements now:
Element8 - C/P and leave it where it lands. Make sure this layer is UNDER the frame layer(s).
(see tag for placement)
Element 20 - C/P and move to top middle of tag. Make sure this layer is also UNDER the frame layer(s).
(see tag for placement)
Element 9 - C/P and re-size 90%. Move to middle left side of tag. Make sure this layer is also UNDER the frame layer(s). Duplicate and mirror.
(see tag for placement)
Element 3 - C/P and re-size 60%. Move to top left corner of frame. Make sure this layer is OVER the frame layer(s). All layers now will be over frame layers.
(see tag for placement)
Element 11 - C/P and re-size 40%. Move to bottom right side of corner of frame. Duplicate and mirror.
(see tag for placement)
Element 4 - C/P and re-size 30%. Move to bottom left middle of frame.
(see tag for placement)
I place the tube layer(s) here:
If you are using the same tube as me. C/P merged tube and mirror. Move her to bottom right corner of tag over element 11.
(see tag for placement)
Add drop shadow to layers of your
choosing.
I used
V & H 2
Opacity 70
Blur 7
Color Black
Now you can add name
and © information. Save as .png and re-size if you wish.
I re-size before I save and add
name and © info.
Let me know what you think of
this tutorial.
This tutorial was written by me on May 11, 2014.
It was made out of my own creation and any similarity is purely coincidental.
I used PSP X2 but any version will do.
Artist: Verymany
You can find this tube at Verymany Tubes Store HERE
Please Don't use this tube without a license.
Scrap Kit: Gypsy Life by Graphics Of Fantasy
This kit can be found at Graphics Of Fantasy. HERE
Mask: WSL 84 HERE
Here goes:
New Raster – 800 X 800.
Open Paper 2. Open mask (WSL 84) and minimize.
SELECTIONS – SELECT ALL – Copy and paste Paper 2 into selection.
Go to LAYERS – NEW MASK LAYER – FROM IMAGE – SOURCE LUMINANCE - CHECKED – from menu, find WSL 84 – OK. Duplicate and merge down. Re-size 115%.
Lets do some elements now:
Element 77 - C/P and re-size 50%. Move to lower left side of tag. Duplicate and mirror.
(see tag for placement)
Element 3 - C/P and re-size 80%. Move to middle left side of tag. Duplicate and mirror.
(see tag for placement)
Element 83 - C/P and re-size 80%. Move to lower left side of tag in front of element 3 and 77. Duplicate and mirror.
(see tag for placement)
Element 23 - C/P and move to middle of tag.
(see tag for placement)
Element 95 - C/P and re-size 30%. Move to upper right side of tag over element 23.
(see tag for placement)
Element 96 - C/P and re-size 30%. Move to upper left side of tag over element 23.
(see tag for placement)
Element 42 - C/P and re-size 80%. Mirror and move to lower middle of tag.
(see tag for placement)
Element 62 - C/P and re-size 25%. Move to middle of element 42.
(see tag for placement)
Element 74 - C/P and re-size 40%. Move to left side of element 42.
(see tag for placement)
Element 22 - C/P and re-size 50%. Move to bottom left corner of tag.
(see tag for placement)
Element 38 - C/P and re-size 60%. Move to bottom left corner over element 22.
(see tag for placement)
Element 21 - C/P and re-size 80%. Move to top right corner of tag.
(see tag for placement)
Element 91 - C/P and move to right side of tag over element 38.
(see tag for placement)
Now for the tube(s):
If you are using the same tags as me, grab it now. C/P and re-size 55%. Move her to the bottom left side of tag.
I used:
V & H 2
Opacity 70
Blur 7
Color Black
Now you can add name and © information. Save as .png and re-size if you wish.
Save and add
name and © info.
Let me know what you think of
this tutorial.
I would love to see any results.
Subscribe to:
Comments
(Atom)