Search
SCRAPS BY P & A DEZIGNS . Powered by Blogger.
Labels
CT Tutorials
PTU Tutorials
Amy Maries Kits
CDO
Devilish Dezines
Arthur Crowe
Pics For Design
Ismael Rac
Alex Prihodko
Scrappin with Lil Ole Me
CT Tag
Verymany
Rieneke Designs
Alicia Mujica
HorsePlay's Pasture
CT Tags
Zlata_M
Creative Crazy Scraps
Sassi Designs
Bookworms Dezines
Enamorte
Kizzed By Kelz
Masks
Scraps N Company
Bibi's Collection
Graphics Of Fantasy
Anna Marine
Foxy Designz
Design By Joan
Kandii Popz Dezignz
Ladyhawwk Designs
Rissas Designs
Bibi Van G Kits
Enys Guerrero
Exclusive Kit
Rebel Dezines
Spazzd Art
Alehandra Vanhek
Baby Cakes Scraps
Eugene Rzhevskii
Millie's PSP Madness Templates
MistyLynn Creations
Sandy's Designs
Bibi's Creation
FTU Tutorials
Scraps From The Heart
Twilight Scraps
Wicked Creationz Scraps
2013 Water Gun
ACDiva's
BLT Dezignz
Bibi's Creations
Cluster Frames
Kandi Kissez Template
Schnegge Scraps
Snags
Treasured Scraps
WD Designz
Alehandra Vanhak
Animated
Dave Nestler
Deacon Black
Dzines From The Heart
JT's Designs
Lily Rose Designs
Lizquis Scraps
Mashi
MediEvil Creations
Rainbow Pixie Stick Scraps
Sweet Pinup
Tammy Kat Dezigns
Templates
Vicki's Scraps
Wicked Creations Scraps
Wicked Little Cupcake
Followers
Forums I'm a member of
Saturday, 30 May 2015
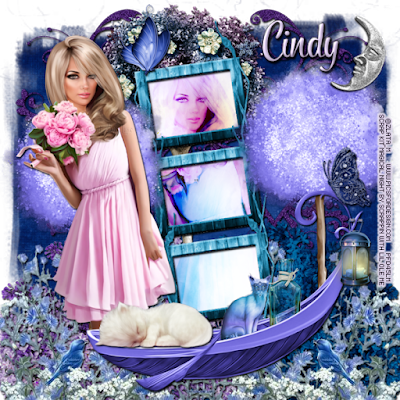
PTU Magical Nights
This tutorial was written by me on May 30, 2015.
It was made out of my own creation and any similarity is purely
coincidental.
I used PSP X6 but any version would work.
Artist: Zlata_M
You can find this tube at Pics For Design HERE
Mask: WSL 3 HERE
Let’s start with the mask layer:
New Raster – 800 X 800.
Open Paper 5. Open mask (WSL 3) and minimize.
SELECTIONS – SELECT ALL – Copy and paste Paper 5 into selection.
Go to LAYERS – NEW MASK LAYER – FROM IMAGE – SOURCE LUMINANCE - CHECKED – from menu, find WSL 3 – OK.
Duplicate and merge down.
(see tag for placement)
Element 124 - C/P and move to bottom right corner of tag.
Make sure this layer is UNDER the frame layer(s).
I've used
V & H 2
Opacity 70
Blur 7
Color Black
Now you can add name
and © information. Save as .png and re-size if you wish.
I re-size before I add
name and © info and then save.
Let me know what you think of
this tutorial.
Subscribe to:
Post Comments
(Atom)
My TOU
All things I provide on this blog are my own creation.
The tutorials here are merely guidelines and you are perfectly welcome to do your own thing.
Any resemblance to others is strictly coincidence.
Please do not share.
Do not claim as yours.
If you use any items here please link back to my blog.
No translations of my tutorials.The tutorials here are merely guidelines and you are perfectly welcome to do your own thing.
All links were current and available at the time of their posting. I cannot control who comes and goes, so if you find a broken link, please use a suitable replacement item.
Feel free to send me anything that you make with my stuff and I will gladly showcase it. My email is merrittlise@gmail.com

0 comments:
Post a Comment