Tuesday, 7 January 2014
This tutorial was written by me on January 7, 2014.
It was made out of my own creation and any similarity is purely coincidental.
I used PSPx2 but any version will do.
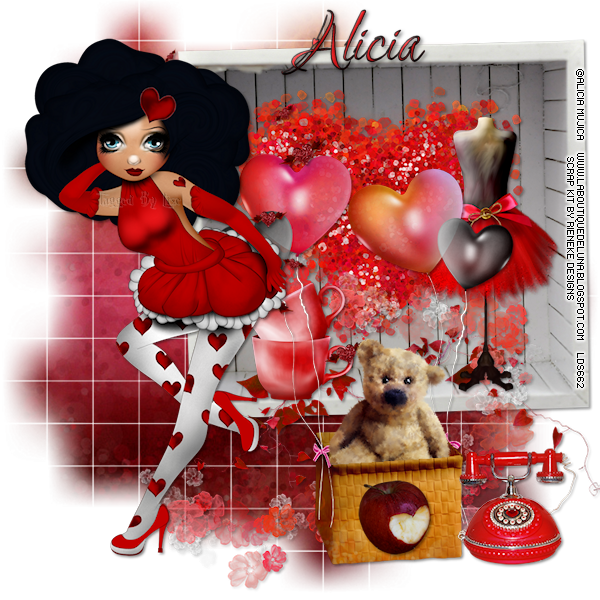
Artist: Alica Mujica
You can find this tube at the La Boutique De Luna HERE
Please Don't use this tube without a license.
Scrap Kit: Cherish The Love by Rieneke Designs
You can find this kit at the Twilight Scraps HERE
Mask: WSL 84 HERE
Here goes:
Let’s start
with the mask layer:
New Raster – 800 X 800.
Open Paper 8. Open mask (WSL 84) and minimize.
SELECTIONS – SELECT ALL – Copy and paste Paper 8 into selection.
Go to LAYERS – NEW MASK LAYER – FROM IMAGE – SOURCE LUMINANCE - CHECKED – from menu, find WSL 84 – OK. Duplicate and merge down. Re-size 115%.
Some elements now:
Element 103 - C/P and move to upper right corner of tag.
(see tag for placement)
Element 91 - C/P and move to lower part of element 103.
(see tag for placement)
Element 94 - C/P and re-size 80%. Move to middle of element 103
(see tag for placement)
Element 48 - C/P and move to bottom right side of tag.
(see tag for placement)
Element 61 - C/P and re-size 70%. Move to bottom right side of element 103.
(see tag for placement)
Element 23 - C/P and re-size 30%. Move to bottom left side of element 103.
(see tag for placement)
Element 11 - C/P and move to bottom of tag but a little to the right.
(see tag for placement)
Element 28 - C/P and move to bottom of tag over element 11.
(see tag for placement)
Element 71 - C/P and re-size 40%. Move to bottom right side over element 11.
(see tag for placement)
Here we do something to this element to make him look like he is sitting in the basket.
We take our freehand selection tool. I used Point to Point. Draw a square around the top of the basket like I did here. Then go to SELECTIONS - INVERT.

Grab your eraser tool. Make sure element 71 is highlighted. Erase the bottom part of element 71 that is hanging over top as I did.
 Then go to SELECTIONS - SELECT NONE.
Element 12 - C/P and re-size 25%. Move to bottom and a bit right to sit in front of element 11.
(see tag for placement)
Element 4 - C/P and re-size 30%. Move to bottom right corner of tag.
(see tag for placement)
I place the tube layer here:
If you are using the same tube as me, grab it now. C/P and re-size 40%. Move to bottom left side of tag. Make her look like her foot is sitting on bottom of element 103.
(see tag for placement)
New Raster – 800 X 800.
Open Paper 8. Open mask (WSL 84) and minimize.
SELECTIONS – SELECT ALL – Copy and paste Paper 8 into selection.
Go to LAYERS – NEW MASK LAYER – FROM IMAGE – SOURCE LUMINANCE - CHECKED – from menu, find WSL 84 – OK. Duplicate and merge down. Re-size 115%.
Some elements now:
Element 103 - C/P and move to upper right corner of tag.
(see tag for placement)
Element 91 - C/P and move to lower part of element 103.
(see tag for placement)
Element 94 - C/P and re-size 80%. Move to middle of element 103
(see tag for placement)
Element 48 - C/P and move to bottom right side of tag.
(see tag for placement)
Element 61 - C/P and re-size 70%. Move to bottom right side of element 103.
(see tag for placement)
Element 23 - C/P and re-size 30%. Move to bottom left side of element 103.
(see tag for placement)
Element 11 - C/P and move to bottom of tag but a little to the right.
(see tag for placement)
Element 28 - C/P and move to bottom of tag over element 11.
(see tag for placement)
Element 71 - C/P and re-size 40%. Move to bottom right side over element 11.
(see tag for placement)
Here we do something to this element to make him look like he is sitting in the basket.
We take our freehand selection tool. I used Point to Point. Draw a square around the top of the basket like I did here. Then go to SELECTIONS - INVERT.
Grab your eraser tool. Make sure element 71 is highlighted. Erase the bottom part of element 71 that is hanging over top as I did.
Element 12 - C/P and re-size 25%. Move to bottom and a bit right to sit in front of element 11.
(see tag for placement)
Element 4 - C/P and re-size 30%. Move to bottom right corner of tag.
(see tag for placement)
I place the tube layer here:
If you are using the same tube as me, grab it now. C/P and re-size 40%. Move to bottom left side of tag. Make her look like her foot is sitting on bottom of element 103.
(see tag for placement)
Add drop shadow to layers of your
choosing.
I used
V & H 2
Opacity 70
Blur 7
Color Black
Now you can add name
and © information. Save as .png and re-size if you wish.
I re-size before I save and add
name and © info.
Let me know what you think of
this tutorial.
Subscribe to:
Post Comments
(Atom)
0 comments:
Post a Comment