Showing posts with label Gaetano Di Falco. Show all posts
Showing posts with label Gaetano Di Falco. Show all posts
Sunday, 26 January 2014

This tutorial was written by me on January 26, 2014.
It was made out of my own creation and any similarity is purely coincidental.
I used PSPx2 but any version will do.
Artist: Gaetano Di Falco
You can find this tube at Creative Design Outlet HERE
Please Don't use this tube without a license.
Scrap Kit: Butterfly Fire by Devilish Dezines
This kit is exclusive Scraps & Co. and can be found HERE
Mask: WSL 84 HERE
Here goes:
New Raster – 800 X 800.
Open Paper 5. Open mask (WSL 84) and minimize.
SELECTIONS – SELECT ALL – Copy and paste Paper 5 into selection.
Go to LAYERS – NEW MASK LAYER – FROM IMAGE – SOURCE LUMINANCE - CHECKED – from menu, find WSL 84 – OK. Duplicate and merge down. Re-size 115%.
Lets do some elements now:
Element 28 - C/P and leave it where it lands, over the mask layer.
(see tag for placement)
Element 32 - C/P and leave it where it lands over element 28 layer.
(see tag for placement)
Element 22 - C/P and move to bottom middle of tag. Duplicate and mirror then flip.
(see tag for placement)
Element 43 - C/P and re-size 80%. Move to left side of tag. Duplicate and mirror.
(see tag for placement)
Element 9 - C/P and re-size 50%. Move to top left side of element 43. Duplicate and mirror.
(see tag for placement)
Element 17 - C/P and re-size 84%. Move to far left side of element 43. Duplicate and mirror.
(see tag for placement)
Element 8 - C/P and re-size 50%. Move to bottom left side of tag. Duplicate and mirror.
(see tag for placement)
Element 3 - C/P and move to bottom left side of tag. Duplicate and mirror.
(see tag for placement)
Element 10 - C/P and move to bottom middle of tag.
(see tag for placement)
Element 6 - C/P and move to bottom middle of tag.
(see tag for placement)
Element 20 - C/P and move to bottom left side of tag. Duplicate, mirror and move to upper right corner of tag.
(see tag for placement)
Element 49 - C/P and re-size 30%. Move to middle right side of tag.
(see tag for placement)
Now for the tube(s):
If you are using the same tags as I, grab it now. C/P and move to the bottom and a bit to the left side of tag.
Add drop shadow to layers of your choosing.
I used:
V & H 2
Opacity 70
Blur 7
Color Black
Now you can add name and © information. Save as .png and re-size if you wish.
Save and add
name and © info.
Let me know what you think of
this tutorial.
I would love to see any results.
Saturday, 11 January 2014
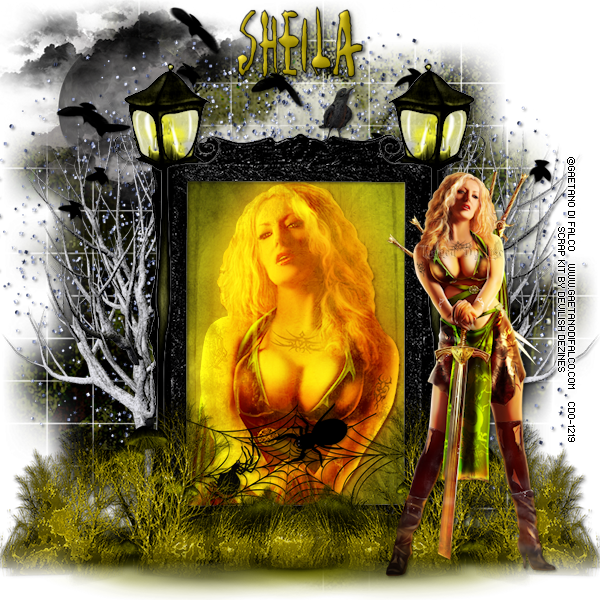
PTU Haunted
This tutorial was written by me on January 11, 2014.
It was made out of my own creation and any similarity is purely coincidental.
I used PSPx2 but any version will do.
Artist: Gaetano Di Falco
You can find this tube at Creative Design Outlet HERE
Please Don't use this tube without a license.
Scrap Kit: Haunted by Devilish Dezines
You can find this kit at Digital Chaos HERE
Mask: WSL 84 HERE
Let’s start with the mask layer:
New Raster – 800 X 800.
Open Paper 6. Open mask (WSL 84) and minimize.
SELECTIONS – SELECT ALL – Copy and paste Paper 6 into selection.
Go to LAYERS – NEW MASK LAYER – FROM IMAGE – SOURCE LUMINANCE - CHECKED – from menu, find WSL 84 – OK. Duplicate and merge down. Re-size 115%.
This will be the frame layer:
Frame 4 – C/P and re-size 70%. Make sure your frame layer is still highlighted. Grab your magic wand. Click in the middle of the frame.
Add NEW RASTER LAYER - C/Paste into selection Paper 2.
Keep selected.
Now grab the tube you are using. If you are using the same one as me, grab the CU of it now. C/P and move her into position.
SELECTIONS - INVERT - DELETE - SELECTIONS - INVERT. Duplicate the tube layer.
ADJUST – BLUR – GAUSSIAN BLUR – RADIUS 25 - OK.
Change BLEND MODE of copy of tube layer to HARD LIGHT and change the original tube layer to OVERLAY.
(see tag for placements)
Now for some elements:SELECTIONS – SELECT ALL – Copy and paste Paper 6 into selection.
Go to LAYERS – NEW MASK LAYER – FROM IMAGE – SOURCE LUMINANCE - CHECKED – from menu, find WSL 84 – OK. Duplicate and merge down. Re-size 115%.
This will be the frame layer:
Frame 4 – C/P and re-size 70%. Make sure your frame layer is still highlighted. Grab your magic wand. Click in the middle of the frame.
Add NEW RASTER LAYER - C/Paste into selection Paper 2.
Keep selected.
Now grab the tube you are using. If you are using the same one as me, grab the CU of it now. C/P and move her into position.
SELECTIONS - INVERT - DELETE - SELECTIONS - INVERT. Duplicate the tube layer.
ADJUST – BLUR – GAUSSIAN BLUR – RADIUS 25 - OK.
Change BLEND MODE of copy of tube layer to HARD LIGHT and change the original tube layer to OVERLAY.
(see tag for placements)
Element 37 – C/P and re-size 70%. Move to top left corner of tag. Make sure this layer is UNDER all frame layers.
(see tag for placement)
Element 41 – C/P and re-size 70%. Move to top right side of tag. Make sure this layer is UNDER all frame layers.
(see tag for placement)
Element 16 – C/P and move up a little bit on tag. Make sure this layer is UNDER all frame layers.
(see tag for placement)
Element 6 - C/P and move to right side of tag. Duplicate and mirror. Make sure these layers are UNDER all frame layers.
(see tag for placement)
Element 33 – C/P and move to top middle of tag. Make sure this layer in UNDER all frame layers.
(see tag for placement)
Element 43 – C/P and re-size 60%. Move to bottom and a bit left on frame. Make sure this layer is OVER the frame layers.
(see tag for placement)
Element 7 – C/P and re-size 70%. Move to left side of frame. Duplicate and mirror.
(see tag for placement)
Element 19 - C/P and re-size 60%. Move to bottom right side of tag. Duplicate and mirror.
(see tag for placement)
Element 31 - C/P and re-size 60%. Move to bottom right side of tag over element 19. Duplicate and mirror.
(see tag for placement)
Element 49 - C/P and re-size 15%. Move to top right side of frame.
(see tag for placement)
Element 41 – C/P and re-size 70%. Move to top right side of tag. Make sure this layer is UNDER all frame layers.
(see tag for placement)
Element 16 – C/P and move up a little bit on tag. Make sure this layer is UNDER all frame layers.
(see tag for placement)
Element 6 - C/P and move to right side of tag. Duplicate and mirror. Make sure these layers are UNDER all frame layers.
(see tag for placement)
Element 33 – C/P and move to top middle of tag. Make sure this layer in UNDER all frame layers.
(see tag for placement)
Element 43 – C/P and re-size 60%. Move to bottom and a bit left on frame. Make sure this layer is OVER the frame layers.
(see tag for placement)
Element 7 – C/P and re-size 70%. Move to left side of frame. Duplicate and mirror.
(see tag for placement)
Element 19 - C/P and re-size 60%. Move to bottom right side of tag. Duplicate and mirror.
(see tag for placement)
Element 31 - C/P and re-size 60%. Move to bottom right side of tag over element 19. Duplicate and mirror.
(see tag for placement)
Element 49 - C/P and re-size 15%. Move to top right side of frame.
I'll place the tube layer now:
If you are using the same tube as me, grab it now. C/P and mirror. Move to bottom right corner of tag.
(see tag for placement)
Add drop shadow to layers of your
choosing.
I used
V & H 2
Opacity 70
Blur 7
Color Black
Now you can add name and © information. Save as .png and re-size if you wish.
I used
V & H 2
Opacity 70
Blur 7
Color Black
Now you can add name and © information. Save as .png and re-size if you wish.
I re-size before I save and add
name and © info.
Let me know what you think of
this tutorial.
Friday, 28 June 2013

*Right Click - Open Link In New Tab - On All Images To View Full Size*
PTU Wicked Attraction
This tutorial was written by me on June 28, 2013.
It was made out of my own creation and any similarity is purely
coincidental.
I used PSPx2 but any version would work.
Artist: Gaetano Di Falco
He sells his art at CDO HERE
Do not use this tube
unless you have a license.
Scrap Kit: Wicked Attraction by
Amy Marie’s Kits
You can find her kits at Amy Marie’s Kits Store HERE
Mask: Vix Big Mask 018 HERE
Font: Elegant Dragon Font HERE
Here goes:
The mask layer.
Open PP7. Hold down SHIFT button
and tap you “D” key. Close Original PP7.
Choose mask. I am using MB &
SW18.
Go to LAYERS – NEW MASK LAYER – FROM IMAGE – SOURCE LUMINANCE CHECKED –
CHOOSE Vix Big Mask 018 FROM DROP DOWN – OK.
Some elements:
Element 57 – C/P and move to bottom left of tag. Duplicate and mirror.
(see tag for placement)
Element 50 – C/P and move to left side of tag. Duplicate and mirror.
(see tag for placement)
Now some frame elements:
Element 47 – C/P and leave in the middle of tag.
(see tag for placement)
Grab magic wand tool. Click
inside frame layer.
NEW RASTER LAYER – Open PP018 – COPY AND PASTE INTO SELECTION.
Keep selected. If you are using
same tube as me, open tube and select the CU of tube.
C/P over paper layer. SELECTIONS –
INVERT – DELETE – INVERT.
Duplicate tube layer. ADJUST –
BLUR – GAUSSIAN BLUR – RADIUS 25 – OK.
SELECTIONS – SELECT NONE.
Highlight copy layer of tube.
Change BLEND MODE of copy to HARD LIGHT and go to original tube layer
and change the BLEND MODE to DODGE.
(see tag for placement of all items)
More elements:
Element 23 – C/P and move to the
right of the frame layer. Duplicate and
mirror.
(see tag for placement)
Element 72 – C/P and move to right side of frame layer. Duplicate and mirror.
(see tag for placement)
Element 30 – C/P and move to right side of frame layer. Duplicate and mirror.
(see tag for placement)
Element 21 – C/P and re-size 70%.
Move to left side of frame layer.
(see tag for placement)
Element 119 – C/P and move to lower right over frame layer.
(see tag for placement)
Element 85 - C/P and move to lower
right side of frame layer. Duplicate and
mirror.
(see tag for placement)
Element 54 – C/P and move to bottom middle of frame layer.
(see tag for placement)
Now the tube layer:
If you are using the same tube as
me,
I re-sized the tag 600 X 600 before I did this. Open tube.
Choose full size version you like.
C/P tube and move to this layer down under Element 21 layer. Move tube up just a little.
(see tag for placement)
Element 24 – C/P and re-size 80%.
Move under tube layer and make it look like it’s coming from hand.
Add drop shadow to layers of your choosing.
I used
V & H 2
Opacity 70
Blur 7
Color Black
Now you can add name and © information. Save as .png
and re-size if you wish.
I re-size before I save and add name and © info.
Let me know what you think of this tutorial.
Monday, 3 June 2013

*Right Click - Open Link In New Tab - On All Images To View Full Size*
PTU Realm Of Hell
This tutorial was written by me on June 3, 2013.
It was made out of my own creation and any similarity is purely coincidental.
I used PSPx2 but any version will do.
Artist: Gaetano DiFalco
Do not use this tube unless you have a license.
You can find this tube at CDO HERE
Scrap Kit: Pendragon by Devilish Dezines.
You can find her kits HERE
Mask: Melissaz Creations Mask13 HERE
Font: Clipper Script HERE
OK, let's get started.
Start a new image 700 X 700 - Transparent.
Highlight very bottom layer.
Open Paper6
SELECTIONS - SELECT ALL - NEW RASTER LAYER - C/PASTE INTO SELECTION Paper6 - SELECTION NONE
LAYERS - NEW MASK LAYER - FROM IMAGE - SOURCE LUMINANCE CHECKED - Melissaz Creations Mask13 - OK - MERGE GROUP.
Use selection tool using the following settings.
Start in the middle of mask and move out till you have a selection that looks something like this:

C/P the tube. SELECTIONS - INVERT - DELETE - INVERT - DUPLICATE -
ADJUST - BLUR - GAUSSIAN BLUR - RADIUS 25 - OK - SELECTIONS - SELECT
NONE.
Change blend mode of copy to Hard Light and change the blend mode of
original tube layer to Overlay and reduce opacity to 34 for both layers.
Now for the elements.
Element 3 - C/P and re-size 80%.
(see tag for placement)
Element 19
- C/P and re-size 80%. Move down.
(see tag for placement)
Element 30 - C/P and re-size 50%. Move top left of tag. Duplicate and mirror then flip.
(see tag for placement).
Element 47 - C/P and re-size 70%. Mirror and move down and to the right.
Element 10 - C/P and re-size 50%. Move top left over Element 30.
(see tag for placement).
Element 22 - C/P and re-size 50%. Move bottom right over copy of Element 30.
(see tag for placement)
Element 45 - C/P and re-size 60%. Move to bottom left of tag.
(see tag for placement)
Element 21 - C/P and re-size 80%. Move down to bottom of tag.
(see tag for placement)
Element 35 - C/P and re-size 60%. Mirror and flip. Move to top right of tag.
(see tag for placement).
Element 33 - C/P and re-size 25%. Move to bottom right of tag.
(see tag for placement).
Element 50 - C/P and re-size 30%. Move down and to the left.
Element 32 - C/P and move to bottom right side of tag.
(see tag for placement)
Open tube. C/P tube. Move a bit to the right of tag behind last three Elements.
(see tag for placement).
I used
V & H 2
Opacity 70
Blur 7
Color Black
Now you can add name and © information. Save as .PNG and resize if you wish.
I resize before I save and add name and © info.

Subscribe to:
Posts
(Atom)