Showing posts with label Charlotte. Show all posts
Showing posts with label Charlotte. Show all posts
Monday, 3 February 2014
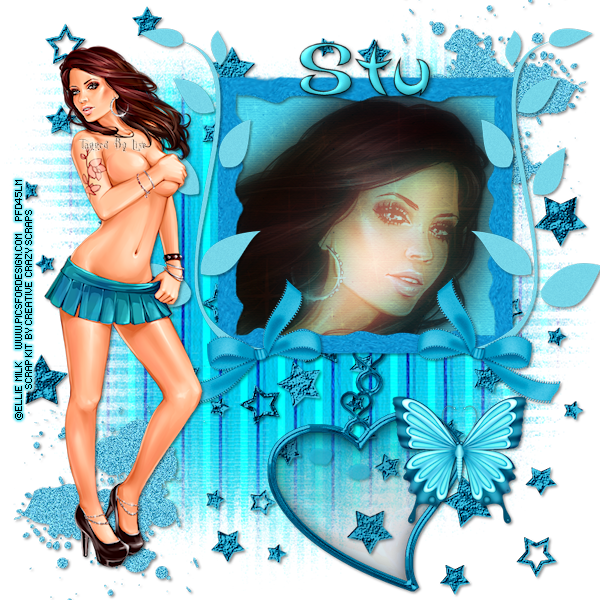
This tutorial was written by me on February 3, 2014.
It was made out of my own creation and any similarity is purely coincidental.
I used PSPx2 but any version will do.
Artist: Ellie Milk
You can find this tube at Pics For Design HERE
Please Don't use this tube without a license.
Scrap Kit: Razzle Dazzle by Creative Crazy Scraps
You can find this kit at Creative Crazy Scraps Store HERE
Mask: WSL 81 HERE
Here goes:
New Raster – 800 X 800.
Open Paper 12. Open mask (WSL 81) and minimize.
SELECTIONS – SELECT ALL – Copy and paste Paper 12 into selection.
Go to LAYERS – NEW MASK LAYER – FROM IMAGE – SOURCE LUMINANCE - CHECKED – from menu, find WSL 81 – OK. Duplicate and merge down.
Now for the frame:
Element 21 - C/P and move it up and a little to the right on the tag.
Make sure Frame 1 is the highlighted layer. Grab your magic wand. Click in the middle of the frame layer.
Go to SELECTIONS - MODIFY - EXPAND 8 PIXELS - INVERT.
Open New Raster Layer. C/Paste into selection Paper 8.
Keep selected.
Now grab the tube you are using. If you are using the same one as me, grab it now. C/P and move her into position.
SELECTIONS - INVERT - DELETE - SELECTIONS - INVERT - DELETE.
Duplicate the tube layer.
ADJUST – BLUR – GAUSSIAN BLUR – RADIUS 25 - OK.
Change BLEND MODE of copy of tube layer to HARD LIGHT and change the original tube layer to MULTIPLY. Reduce OPACITY to 60%
(see tag for placement)
Lets do some elements now:
Element 30 - C/P and move to top left side of tag. Duplicate and mirror then flip. Make sure these layers are UNDER the frame layers.
(see tag for placement)
Element 40 - C/P and move to bottom left side of tag. Duplicate and mirror then flip. Make sure this layer is UNDER the frame layer.
(see tag for placement)
Element 31 - C/P and move to bottom middle of frame. You can make sure this layer is also UNDER the frame layer.
(see tag for placement)
Element 26 - C/P and move to left side of frame. Make sure this layer is OVER the frame layer. Duplicate and mirror.
(see tag for placement)
Element 16 - C/P and re-size 40%. Move to bottom right side of tag over element 26.
(see tag for placement)
Element 10 - C/P and re-size 50%. Move to bottom left corner of frame. Duplicate and mirror.
(see tag for placement)
Now for the tube(s):
If you are using the same tube as me, C/P and re-size 35%. Move her to the far left side of tag.
(see tag for placement)
Add drop shadow to layers of your choosing.
I used:
V & H 2
Opacity 70
Blur 7
Color Black
Now you can add name and © information. Save as .png and re-size if you wish.
Element 21 - C/P and move it up and a little to the right on the tag.
Make sure Frame 1 is the highlighted layer. Grab your magic wand. Click in the middle of the frame layer.
Go to SELECTIONS - MODIFY - EXPAND 8 PIXELS - INVERT.
Open New Raster Layer. C/Paste into selection Paper 8.
Keep selected.
Now grab the tube you are using. If you are using the same one as me, grab it now. C/P and move her into position.
SELECTIONS - INVERT - DELETE - SELECTIONS - INVERT - DELETE.
Duplicate the tube layer.
ADJUST – BLUR – GAUSSIAN BLUR – RADIUS 25 - OK.
Change BLEND MODE of copy of tube layer to HARD LIGHT and change the original tube layer to MULTIPLY. Reduce OPACITY to 60%
(see tag for placement)
Lets do some elements now:
Element 30 - C/P and move to top left side of tag. Duplicate and mirror then flip. Make sure these layers are UNDER the frame layers.
(see tag for placement)
Element 40 - C/P and move to bottom left side of tag. Duplicate and mirror then flip. Make sure this layer is UNDER the frame layer.
(see tag for placement)
Element 31 - C/P and move to bottom middle of frame. You can make sure this layer is also UNDER the frame layer.
(see tag for placement)
Element 26 - C/P and move to left side of frame. Make sure this layer is OVER the frame layer. Duplicate and mirror.
(see tag for placement)
Element 16 - C/P and re-size 40%. Move to bottom right side of tag over element 26.
(see tag for placement)
Element 10 - C/P and re-size 50%. Move to bottom left corner of frame. Duplicate and mirror.
(see tag for placement)
Now for the tube(s):
If you are using the same tube as me, C/P and re-size 35%. Move her to the far left side of tag.
(see tag for placement)
Add drop shadow to layers of your choosing.
I used:
V & H 2
Opacity 70
Blur 7
Color Black
Now you can add name and © information. Save as .png and re-size if you wish.
Save and add
name and © info.
Let me know what you think of
this tutorial.
I would love to see any results.
Tuesday, 24 September 2013

This tutorial was written by me on September 24, 2013.
It was made out of my own creation and any similarity is purely coincidental.
I used PSPx2 but any version will do.
Artist: Roman Zaric
You can find this tube at Roman Zaric Tubes HERE
Please Don't use this tube without a license.
Scrap Kit: Charlotte by Creations By Sanie HERE
Mask: WSL 84 HERE
Font: Coneria Script Demo Font HERE
Here goes:
Let’s start
with the mask layer:
New Raster – 800 X 800.
Open P07. Open mask and minimize.
SELECTIONS – SELECT ALL – Copy and paste P07 into selection.
Go to LAYERS – NEW MASK LAYER – FROM IMAGE – SOURCE LUMINANCE - CHECKED – from menu, find WSL 84 – OK. Duplicate and merge down. Re-size 120%.
New Raster Layer - SEND TO BOTTOM. C/P P02.
SELECTIONS – SELECT ALL – Copy and paste P02 into selection.
Go to LAYERS – NEW MASK LAYER – FROM IMAGE – SOURCE LUMINANCE - CHECKED – from menu, find WSL 84 – OK. Duplicate and merge down.
Gonna put an element here now:
Swirl 1 - C/P and move to top right corner. Duplicate and mirror.
(see tag for placement)
Let’s do the frame layer now:
New Raster – 800 X 800.
Open P07. Open mask and minimize.
SELECTIONS – SELECT ALL – Copy and paste P07 into selection.
Go to LAYERS – NEW MASK LAYER – FROM IMAGE – SOURCE LUMINANCE - CHECKED – from menu, find WSL 84 – OK. Duplicate and merge down. Re-size 120%.
New Raster Layer - SEND TO BOTTOM. C/P P02.
SELECTIONS – SELECT ALL – Copy and paste P02 into selection.
Go to LAYERS – NEW MASK LAYER – FROM IMAGE – SOURCE LUMINANCE - CHECKED – from menu, find WSL 84 – OK. Duplicate and merge down.
Gonna put an element here now:
Swirl 1 - C/P and move to top right corner. Duplicate and mirror.
(see tag for placement)
Let’s do the frame layer now:
Frame 1 – C/P and move to left side of tag. Paste frame again and re-size 80%. Free rotate 50ºright. Move this beside first frame.
Grab your magic wand. Click in the middle of all frames.
SELECTIONS – MODIFY – EXPAND 8 PIXELS. New Raster Layer. Move under frame layer. Open P04. Copy and paste into selection.
If you are using the same tube(s) as me, grab it now. C/P and re-size 50%. Move it into position.
Go to SELECTIONS - INVERT - DELETE - SELECTIONS - INVERT. Duplicate the tube layer. ADJUST – BLUR – GAUSSIAN BLUR – RADIUS 25 - OK
Change BLEND MODE of copy of tube layer to HARD LIGHT and go to original tube layer and change BLEND MODE to SCREEN.
(see tag for placements)
Grab your magic wand. Click in the middle of all frames.
SELECTIONS – MODIFY – EXPAND 8 PIXELS. New Raster Layer. Move under frame layer. Open P04. Copy and paste into selection.
If you are using the same tube(s) as me, grab it now. C/P and re-size 50%. Move it into position.
Go to SELECTIONS - INVERT - DELETE - SELECTIONS - INVERT. Duplicate the tube layer. ADJUST – BLUR – GAUSSIAN BLUR – RADIUS 25 - OK
Change BLEND MODE of copy of tube layer to HARD LIGHT and go to original tube layer and change BLEND MODE to SCREEN.
(see tag for placements)
Now for some more elements after frame layers:
Fan – C/P and move to upper middle of tag.
(see tag for placement)
Rose 5 – C/P and re-size 70%. Move to upper middle of tag over fan.
(see tag for placement)
Rose 5 – C/P and re-size 70%. Move to upper middle of tag over fan.
(see tag for placement)
Hat – C/P and re-size 50%. Move to bottom left of frame.
(see tag for placement)
Rose 1 – C/P and re-size 50%. Mirror and move to the area between the two frames.
(see tag for placement)
Purse - C/P and re-size 30%. Move over Rose 1.
(see tag for placement)
Bottle Champagne - C/P and move to lower middle of tag but a bit left.
(see tag for placement)
(see tag for placement)
Purse - C/P and re-size 30%. Move over Rose 1.
(see tag for placement)
Bottle Champagne - C/P and move to lower middle of tag but a bit left.
(see tag for placement)
Glasses 2 – C/P and move to lower middle but a bit right so it's in front of champagne bottle.
(see tag for placement)
Bubble 2 - C/P and move to it sits over the glasses.
(see tag for placement)
Lip - C/P and re-size 50%. Move to bottom left of tag but to the right of the hat.
(see tag for placement)
Butterfly - C/P and re-size 30%. Move to middle left side of tag over middle of frame.
(see tag for placement)
I place the tube layer here:
If you are using the same tube as me, grab it now. C/P and re-size 50%. Mirror and move to right side of tag.
(see tag for placement)
(see tag for placement)
Bubble 2 - C/P and move to it sits over the glasses.
(see tag for placement)
Lip - C/P and re-size 50%. Move to bottom left of tag but to the right of the hat.
(see tag for placement)
Butterfly - C/P and re-size 30%. Move to middle left side of tag over middle of frame.
(see tag for placement)
I place the tube layer here:
If you are using the same tube as me, grab it now. C/P and re-size 50%. Mirror and move to right side of tag.
(see tag for placement)
Add drop shadow to layers of your
choosing.
I used
V & H 2
Opacity 70
Blur 7
Color Black
Now you can add name
and © information. Save as .png and re-size if you wish.
I re-size before I save and add
name and © info.
Let me know what you think of
this tutorial.
Subscribe to:
Posts
(Atom)