Search

SCRAPS BY P & A DEZIGNS . Powered by Blogger.

Contributors

Followers

Showing posts with label Daniela E. Show all posts
Thursday, 25 June 2015
 
 
*Right Click - Open Link In New Tab - On All Images To View Full Size*

PTU Pirate Booty

This tutorial was written by me on June 25, 2015.
It was made out of my own creation and any similarity is purely coincidental.
I used PSP X6 but any version would work.

Artist: Amberly Berendson
This is a Free To Use tube and can be found @ My Tubed Art Yahoo Group and you will need to sign up for their group  HERE
Even Though this is FTU, Please do not use this tube unless you have a license.
Scrap Kit: Aloha by Daniela E
You can buy this kit at Inspirations Of Scrap Friends  HERE
Mask:  WSL 3 HERE

Let’s start with the mask layer: 
New Raster – 800 X 800.
Open Paper 1.  Open mask (WSL 3) and minimize.
SELECTIONS – SELECT ALL – Copy and paste Paper 1 into selection.
Go to LAYERS – NEW MASK LAYER – FROM IMAGE – SOURCE LUMINANCE - CHECKED – from menu, find WSL 3 – OK.
Duplicate and merge down.

(see tag for placement) 
 
There is no frame layer
Now onto some elements: 
Element 2 - C/P and move to top left corner of tag.
(see tag for placement)
Element 128 - C/P and move to bottom middle of tag.
(see tag for placement)
Element 72 - C/P and move to right side of tag.
(see tag for placement)
Element 36 - C/P and move to left side of tag.
(see tag for placement)
Element 13 - C/P and move to bottom middle of tag.
(see tag for placement) 
Element 88 - C/P and re-size to 50%.  Move to upper middle of tag over element 13.
(see tag for placement)
  Element 31 - C/P and move to bottom middle of tag over element 13.
(see tag for placement)
  Element 29 - C/P and re-size to 50%.  Move to bottom left side of tag, but more near the middle.
(see tag for placement)
Element 27 - C/P and re-size to 50%.  Move to bottom left corner of tag, but to the left of element 29.
(see tag for placement)
Element 90 - C/P and re-size to 50%.  Move to bottom left corner of tag and on the left side of element 27.  Duplicate and mirror.  Move to right side of element 29.
(see tag for placement)
Element 101 - C/P and re-size to 50%.  Move to bottom left side of tag between element 90 and copy of element 90.
(see tag for placement)
Element 120 - C./P and re-size to 50%.  Move to bottom left side of tag in front of element 101.
(see tag for placement)
Element 135 - C/P and re-size to 30%.  Move to bottom right corner of tag.
(see tag for placement)
 Element 95 - C/P and re-size to 15%.  Move to bottom left side of tag in front of the bottom right side of element 120.
(see tag for placement)
Element 99 - C/P and re-size to 15%.  Move to bottom left side of tag, but to the left of element 95.
(see tag for placement)
Element 97 - C/P and re-size to 15%.  Move to bottom left side of tag and on the bottom far left corner of element 120.
(see tag for placement)
Element 96 - C/P and re-size to 15%.  Move to bottom left side of tag, but to the right of element 97.
(see tag for placement)
Element 98 - C/P and re-size to 15%.  Move to bottom left side of tag in front of element 96 and 99.
(see tag for placement)
Element 48 - C/P and re-size to 20%.  Move to bottom right corner of element 120.
(see tag for placement)
Element 47 - C/P and re-size to 20%.  Move to bottom left corner of element 120 and in front of element 97.
(see tag for placement)
 
I placed the tube layer(s) here: 
If you are using the same tube as me, grab it now.  C/P and re-size to 50%.  Move to bottom of tag in between element 120 and 135 but on top of all other layers.
(see tag for placement)
 
Add drop shadow to layers of your choosing.
I've used
V & H 2
Opacity 70
Blur 7
Color Black

 Now you can add name and  © information.  Save as .png and re-size if you wish.
I re-size before I add name and © info and then save.
Let me know what you think of this tutorial.


Friday, 5 June 2015


*Right Click - Open Link In New Tab - On All Images To View Full Size*

PTU Dark Mermaid

This tutorial was written by me on June 5, 2015.
It was made out of my own creation and any similarity is purely coincidental.
I used PSP X6 but any version would work.

Artist: The Hunter
You can find this tube at Scraps N Company  HERE  &  HERE
I got these tubes when I was CT for Scraps And The City.
Do not use these tubes unless you have a license.
Scrap Kit: Pirates of the Pirates by Daniela E
You can find this kit at Pics For Design  HERE
Mask: WSL 3  HERE

Let’s start with the mask layer: 
New Raster – 800 X 800.
Open Paper 6.  Open mask (WSL 3) and minimize.
SELECTIONS – SELECT ALL – Copy and paste Paper 6 into selection.
Go to LAYERS – NEW MASK LAYER – FROM IMAGE – SOURCE LUMINANCE - CHECKED – from menu, find WSL 3 – OK.  
Duplicate and merge down.
(see tag for placement)  
 
This will be the frame layer:   
Frame 6 – C/P and re-size to 75%.  Free rotate 30º left, then move it up just a bit on the tag.  Make sure Frame 6 layer is still highlighted.  
Grab your magic wand.  Click in the middle of frame. 
SELECTIONS - MODIFY - EXPAND 10 pixels. 
NEW RASTER LAYER - C/Paste into selection Paper 9.
KEEP SELECTION
 If you are using the same tubes as me, grab the first one now.  C/P and move her to the bottom left side of paper layer.
SELECTIONS - INVERT - DELETE - SELECTIONS - INVERT.
Element 91, 89 - C/P and re-size to 15%.  Move to top right side of paper layer.  Change opacity to OVERLAY
Element 88 - C/P and re-size to 20%.  Move to upper right side of paper layer.  Change opacity to OVERLAY.
Element 2 - C/P and re-size to 75%.  Move to middle of paper layer over all other layer.
  (see tag for placement)
 
Now onto some elements: 
Element 7 - C/P and re-size to 75%.  Move to bottom middle, but just a bit tot he right on tag.  Make sure this layer is UNDER the frame layer(s).
(see tag for placement)
Element 68 - C/P and move to bottom middle of tag.  Make sure this layer is also UNDER the frame layer(s).
(see tag for placement)
Element 23 - C/P and re-size to 75%.  Move to left side of tag.  Make sure this layer is UNDER the frame layer(s).
(see tag for placement)
Element 26 - C/P and re-size to 75%.  Move to bottom left corner of tag.  Make sure this layer, and all other layer(s), are OVER the frame layer(s).
(see tag for placement) 
Element 79 - C/P and re-size to 50%.  Move to bottom left side of tag.  Duplicate and mirror.
(see tag for placement)
  Element 80 - C/P and re-size to 50%.  Move to bottom left side of tag.  Duplicate and mirror.  Move to right side of element 79.
(see tag for placement) 
Element 33 - C/P move to bottom and a bit to the right on tag.
(see tag for placement)
Element 55 - C/P and re-size to 15%.  Move to bottom right side of tag on the bottom of element 33.
(see tag for placement)
Element 39 - C/P and re-size to 30%.  Move to upper right side of frame.
(see tag for placement)
Element 73 - C/P and re-size to 25%.  Move to bottom left side of tag.
(see tag for placement)
Element 37 - C/P and re-size to 25%.  Move to bottom left side of tag over element 73.
(see tag for placement)
Element 62 - C/P and re-size to 50%.  Move to bottom left side of tag.
(see tag for placement)
Element 38 - C/P and re-size to 40%.  Move to top left corner of tag.
(see tag for placement)
Element 4 - C/P and re-size to 95%.  Move this a little bit to the right.
(see tag for placement)
 
I placed the tube layer(s) here: 
If you are still using the same tubes as me, grab the second one now.  C/P and re-size to 40%.  Mirror then move to bottom right side of tag over element 33.
(see tag for placement) 
 
Add drop shadow to layers of your choosing.
I've used
V & H 2
Opacity 70
Blur 7
Color Black

 Now you can add name and  © information.  Save as .png and re-size if you wish.
I re-size before I add name and © info and then save.
Let me know what you think of this tutorial.


Monday, 11 May 2015
 
 
*Right Click - Open Link In New Tab - On All Images To View Full Size*

PTU Fantasy Woods

This tutorial was written by me on May 11, 2015.
It was made out of my own creation and any similarity is purely coincidental.
I used PSP X6 but any version would work.

Artist: Enamorte
I bought this tube and Creative Design Outlet  HERE 
Do not use this tube unless you have a license.
Scrap Kit: Fantasy Woods by Daniela E
You can buy this kit at Inspiration Of Scrapfriends  HERE
Mask:  WSL 3 HERE

Let’s start with the mask layer: 
New Raster – 800 X 800.
Open Paper 5.  Open mask (WSL 3) and minimize.
SELECTIONS – SELECT ALL – Copy and paste Paper 5 into selection.
Go to LAYERS – NEW MASK LAYER – FROM IMAGE – SOURCE LUMINANCE - CHECKED – from menu, find WSL 3 – OK.
Duplicate and merge down.

(see tag for placement) 
 
There is no frame layer
Now onto some elements: 
Element 35 - C/P and leave this in the middle of the tag.
(see tag for placement)
Element 106 - C/P and re-size to 85%.  Move to far left side of tag.
(see tag for placement)
Element 108 - C/P and move to lower middle of tag.
(see tag for placement)
Element 95 - C/P and leave this in the middle of tag.
(see tag for placement)
Element 82 - C/P and re-size to 85%.  Move to lower part of tag but a bit tot he left of middle.
(see tag for placement) 
Element 68 - C/P and move to bottom left side of tag in front of elements 108, 95 and 82.  Duplicate and mirror.
(see tag for placement)
  Element 102 - C/P and re-size to 50%.  Move to lower right corner of tag.
(see tag for placement)
Element 4 - C/P and re-size to 10%.  Move to right side of tag over element 102.
(see tag for placement)
Element 67 - C/P and move to bottom right corner of tag.  Duplicate and mirror.
(see tag for placement)
Element 87 - C/P and re-size to 50%.  Move to bottom right corner of tag in front of element 67.
(see tag for placement)
Element 42 - C/P and re-size to 30%.  Move to bottom left corner of tag.
(see tag for placement)
 Element 43 - C/P and re-size to 30%.  Mirror and move to bottom left corner beside element 42.
(see tag for placement)
Element 51 - C/P and re-size to 30%.  Move to bottom right corner of tag in front of element 87.
(see tag for placement)
Element 80 - C/P and re-size to 20%.  Move to bottom right corner of tag and to the right of element 51.
(see tag for placement)
 Element 48 - C/P and re-size to 10%.  Move to middle but a bit left on tag.
(see tag for placement)

I placed the tube layer(s) here: 
If you are using the same one as me, grab it now.  C/P re-size 85%.  Move to bottom middle of tag.  Have element 48 look like it is sitting in her hand.
(see tag for placement) 
 
Add drop shadow to layers of your choosing.
I've used
V & H 2
Opacity 70
Blur 7
Color Black

 Now you can add name and  © information.  Save as .png and re-size if you wish.
I re-size before I add name and © info and then save.
Let me know what you think of this tutorial.
  

Friday, 10 April 2015


*Right Click - Open Link In New Tab - On All Images To View Full Size*

PTU Heart Charm

This tutorial was written by me on April 10, 2015.
It was made out of my own creation and any similarity is purely coincidental.
I used PSP X6 but any version would work.

Artist: Sara Butcher
You can find this tube at Creative Design Outlet   HERE
Do not use this tube unless you have a license.
Scrap Kit: Scrap kit Beautiful Spring by Daniela E
You can find this kit at Pics For Design  HERE
Mask: WSL 3 HERE

Let’s start with the mask layer: 
New Raster – 800 X 800.
Open Paper 9.  Open mask (WSL 3) and minimize.
SELECTIONS – SELECT ALL – Copy and paste Paper 9 into selection.
Go to LAYERS – NEW MASK LAYER – FROM IMAGE – SOURCE LUMINANCE - CHECKED – from menu, find WSL 3 – OK.  
Duplicate and merge down.
(see tag for placement) 
 
This will be the frame layer:   
  Frame 2 – C/P and re-size 60%.  Leave it where it lands.  Make sure frame 2 layer is still highlighted.  Grab your magic wand.  Click in the middle of frame.  SELECTIONS - MODIFY - EXPAND 10 pixels.
NEW RASTER LAYER - C/Paste into selection Paper 10.
If you are using the same tube as me, grab it now.  C/P over frame and then move her into position.  Duplicate and move the copy under frame but over paper layer.  SELECTIONS - INVERT - DELETE - SELECTIONS - INVERT - SELECTIONS - SELECT NONE.
Grab your magic wand tool and click in the middle of frame.   
SELECTIONS - INVERT, grab the eraser tool now.  Erase the parts of the original tube you don't want.  SELECTIONS - SELECT NONE.
(see tag for placement)
 
Now onto some elements: 
Element 8 - C/P and move to far right side of tag.  Make sure this layer is UNDER the frame layer(s).  Duplicate and mirror.
(see tag for placement)
Element 1 - C/P and move to far left side of tag.  Make sure this layer is also UNDER the frame layer(s).  Duplicate and mirror.
(see tag for placement)
Element 99 - C/P and move to bottom middle of frame.  Make sure this layer is also UNDER the frame layer(s).
(see tag for placement)
Element 63 - C/P and move to upper left corner of frame.  Move this layer under the original tube layer.  Make sure this layer, and all other layer(s), are OVER the frame layer(s).
(see tag for placement)
Element 37 - C/P and move to bottom middle of tag below element 99.
(see tag for placement)
 Element 31 - C/P and re-size 50%.  Move to bottom right side of frame.
(see tag for placement) 
Element 3 - C/P and re-size 75%.  Move to upper left side of frame.
(see tag for placement)
Element 113 - C/P and re-size 20%.  Move to upper middle left side of tag over element 3.
(see tag for placement)
Element 76 - C/P and move to upper left side of tag in front of element 1 and 99.
(see tag for placement)
Element 13 - C/P and move to upper left side of tag over element 76.
(see tag for placement)
Element 38 - C/P and re-size 40%.  Move to bottom right corner of tag in front of element 13 and 76.
(see tag for placement)
 Element 62 - C/P and re-size 25%.  Move to lower left side of tag.
(see tag for placement)
Element 65 - C/P and move up and a little bit to the left over all layers.
(see tag for placement)

Add drop shadow to layers of your choosing.
I've used
V & H 2
Opacity 70
Blur 7
Color Black

 Now you can add name and  © information.  Save as .png and re-size if you wish.
I re-size before I add name and © info and then save.
Let me know what you think of this tutorial.
   

Wednesday, 1 April 2015
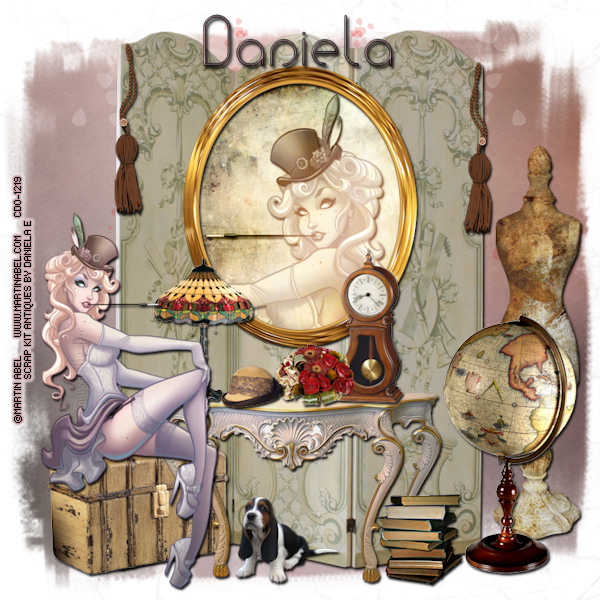


*Right Click - Open Link In New Tab - On All Images To View Full Size*

PTU Annalise

This tutorial was written by me on April 1, 2015.
It was made out of my own creation and any similarity is purely coincidental.
I used PSP X6 but any version would work.

Artist: Martin Abel
You can find this tube at Creative Design Outlet   HERE
Do not use this tube unless you have a license.
Scrap Kit: Antiques by Daniela E
You can find this kit at Pics For Design  HERE
Mask: WSL 3  HERE

Let’s start with the mask layer: 
New Raster – 800 X 800.
Open Paper 15.  Open mask (WSL 3) and minimize.
SELECTIONS – SELECT ALL – Copy and paste Paper 15 into selection.
Go to LAYERS – NEW MASK LAYER – FROM IMAGE – SOURCE LUMINANCE - CHECKED – from menu, find WSL 3 – OK.  
Duplicate and merge down.
(see tag for placement) 
 
This will be the frame layer:   
Frame 9 – C/P and re-size 50% then move it up just a bit.  Make sure frame 9 layer is still highlighted.  Grab your magic wand.  Click in the middle of frame.  
NEW RASTER LAYER - C/Paste into selection Paper 5.
SELECTION - SELECT NONE.  Now grab the tube you are using.
If you are using the same one as me, grab it now.
C/P and mirror then move her into position.
SELECTIONS - INVERT - DELETE - SELECTIONS - INVERT.
Duplicate the tube layer.
ADJUST – BLUR – GAUSSIAN BLUR – RADIUS 25 - OK.
Change BLEND MODE of copy of tube layer to HARD LIGHT and leave the original tube layer on LUMINANCE (L).
(see tag for placement)
 
Now onto some elements: 
Element 47 - C/P and re-size 75%.  Move to upper right corner of tag.  Make sure this layer is UNDER the frame layer(s).  Duplicate and mirror.
(see tag for placement)
Element 89 - C/P and re-size 90%.  Move to bottom middle of tag.  Make sure this layer is UNDER the frame layer(s). 
(see tag for placement)
Element 161 - C/P and re-size 40%.  Move to upper right corner of element 89.  Make sure this layer, and all other layer(s), are OVER the frame layer(s).  Duplicate and mirror.
(see tag for placement)
Element 84 - C/P and re-size 75%.  Move to bottom right corner of tag.
(see tag for placement) 
Element 2 - C/P and re-size 50%.  Move to bottom right corner of tag, in front of but to the left of element 84.
(see tag for placement)
Element 6 - C/P and re-size 50%.  Move to bottom left corner of tag.
(see tag for placement)
 Element 55 - C/P and re-size 50%.  Move to bottom middle of tag under frame.
(see tag for placement) 
Element 128 - C/P and re-size 15%.  Move to bottom right side of tag but to the left of element 2.
(see tag for placement)
Element 48 - C/P and re-size 30%.  Move to bottom middle of frame over element 128.
(see tag for placement)
Element 81 - C/P and re-size 30%.  Move to bottom middle of frame but to the left side on element 128.
(see tag for placement)
Element 40 - C/P and re-size 15%.  Move to bottom middle of frame but to the right of element 81.
(see tag for placement)
Element 75 - C/P and re-size 20%.  Move to bottom middle of tag under element 128.
(see tag for placement)

I placed the tube layer(s) here: 
If your gonna use the same tube as I did, C/P your choice of the full version of the tube now.  Move her to the bottom left side of tag and make her look like she is sitting on element 6.
(see tag for placement) 
 
Add drop shadow to layers of your choosing.
I've used
V & H 2
Opacity 70
Blur 7
Color Black

 Now you can add name and  © information.  Save as .png and re-size if you wish.
I re-size before I add name and © info and then save.
Let me know what you think of this tutorial.
   

My TOU

All things I provide on this blog are my own creation.
Any resemblance to others is strictly coincidence.
Please do not share.
Do not claim as yours.
If you use any items here please link back to my blog.
No translations of my tutorials.
The tutorials here are merely guidelines and you are perfectly welcome to do your own thing.
All links were current and available at the time of their posting. I cannot control who comes and goes, so if you find a broken link, please use a suitable replacement item.
Feel free to send me anything that you make with my stuff and I will gladly showcase it. My email is merrittlise@gmail.com

Talk to Me