Showing posts with label Amy Matthews. Show all posts
Showing posts with label Amy Matthews. Show all posts
Friday, 7 November 2014
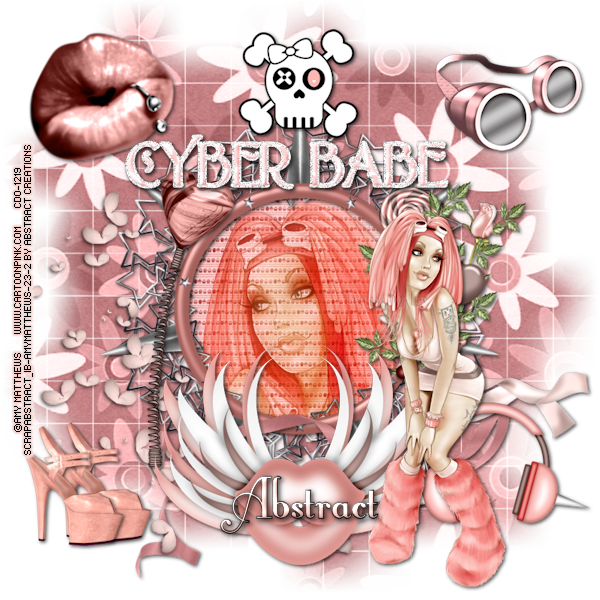
PTU Cyber Babe
This tutorial was written by me on November 7, 2014.
It was made out of my own creation and any similarity is purely
coincidental.
I used PSP X6 but any version would work.
Artist: Amy Matthews
I bought this tube at Creative Design Outlet HERE
Do not use this tube
unless you have a license.
Scrap Kit: ScrapAbstract_IB-AmyMatthews-23-2
You can find this kit by Abstract Creations at Creative Design Outlet HERE
You can find this kit by Abstract Creations at Creative Design Outlet HERE
Mask: WSL 84 HERE
Let’s start with the mask layer:
New Raster – 800 X 800.
Open Paper 4. Open mask (WSL 84) and minimize.
SELECTIONS – SELECT ALL – Copy and paste Paper 4 into selection.
Go to LAYERS – NEW MASK LAYER – FROM IMAGE – SOURCE LUMINANCE - CHECKED – from menu, find WSL 84 – OK. Duplicate and merge down.
Re-size 115%.
Let’s start with the mask layer:
New Raster – 800 X 800.
Open Paper 4. Open mask (WSL 84) and minimize.
SELECTIONS – SELECT ALL – Copy and paste Paper 4 into selection.
Go to LAYERS – NEW MASK LAYER – FROM IMAGE – SOURCE LUMINANCE - CHECKED – from menu, find WSL 84 – OK. Duplicate and merge down.
Re-size 115%.
Now onto some elements:
Element 14 - C/P and move to bottom and a bit right on tag. Make sure this layer, and all other layer(s), are OVER frame layer(s).
Element 11 - C/P and mirror and move to far bottom left corner.
Element 8 - C/P and move to far left side of frame.
If you are using the same tube as me. C/P and mirror, then move to bottom right side of frame.
Add drop shadow to layers of your
choosing.
I've used
V & H 2
Opacity 70
Blur 7
Color Black
Now you can add name
and © information. Save as .png and re-size if you wish.
I re-size before I add
name and © info and then save.
Let me know what you think of
this tutorial.
Friday, 7 February 2014

This tutorial was written by me on February 7, 2014.
It was made out of my own creation and any similarity is purely coincidental.
I used PSPx2 but any version will do.
Artist: Amy Matthews
You can find this tube at Creative Design Outlet HERE
Please Don't use this tube without a license.
Scrap Kit: IB Scrap Kit Amy Matthews Individual Tube 19-2
by Ladyhawwk Designs
You can find this kit at Creative Design Outlet HERE
Mask: WSL 84 HERE
Here goes:
New Raster – 800 X 800.
Open Paper 3. Open mask (WSL 84) and minimize.
SELECTIONS – SELECT ALL – Copy and paste Paper 3 into selection.
Go to LAYERS – NEW MASK LAYER – FROM IMAGE – SOURCE LUMINANCE - CHECKED – from menu, find WSL 84 – OK. Duplicate and merge down. Re-size 115%
Frame 1 - C/P and re-size 80%. Leave it where it lands.
Grab your magic wand. Click in the middle of the frame layer.
Go to SELECTIONS - MODIFY - EXPAND 8 PIXELS - INVERT.
Open New Raster Layer. C/Paste into selection Paper 6.
Keep selected.
Now grab the tube you are using. If you are using the same one as me, grab the CU now. C/P and mirror and move her into position.
SELECTIONS - INVERT - DELETE - SELECTIONS - INVERT.
Duplicate the tube layer.
ADJUST – BLUR – GAUSSIAN BLUR – RADIUS 25 - OK.
Change BLEND MODE of copy of tube layer to HARD LIGHT and change the original tube layer to LUMINANCE (L). Reduce OPACITY to 75%.
(see tag for placement)
Lets do some elements now:
Wordart - C/P and leave where it lands. Make sure it is UNDER the frame layers. Used the same settings as bellow, but for the color I used white and then I did it a second time and changed the V&H to -2. Then I did a regular drop shadow with color black.
(see tag for placement)
Element 17 - C/P and re-size 80%. Move to the right side of tag. Duplicate and mirror. Make sure these layers are UNDER the frame layers.
(see tag for placement)
Element 16 - C/P and re-size 50%. Move to top left corner of frame. Duplicate and mirror. Make sure this layer is OVER the frame layer.
(see tag for placement)
Element 14 - C/P and re-size 40%. Move to top left corner of frame over element 16. Duplicate and mirror.
(see tag for placement)
Element 11 - C/P and re-size 60%. Move to bottom right side of frame. Duplicate and mirror.
(see tag for placement)
Element 22 - C/P and re-size 40%. Move to bottom right side of tag.
(see tag for placement)
Element 10 - C/P and re-size 30%. Move to bottom right side of tag in beside element 22.
(see tag for placement)
Element 24 - C/P and re-size 40%. Move to bottom middle of frame.
(see tag for placement)
Now for the tube(s):
If you are using the same tube as me, grab the full size tube now. C/P and move her to the far left side of tag.
(see tag for placement)
Add drop shadow to layers of your choosing.
I used:
V & H 2
Opacity 70
Blur 7
Color Black
Now you can add name and © information.
Save as .png and re-size if you wish.
Grab your magic wand. Click in the middle of the frame layer.
Go to SELECTIONS - MODIFY - EXPAND 8 PIXELS - INVERT.
Open New Raster Layer. C/Paste into selection Paper 6.
Keep selected.
Now grab the tube you are using. If you are using the same one as me, grab the CU now. C/P and mirror and move her into position.
SELECTIONS - INVERT - DELETE - SELECTIONS - INVERT.
Duplicate the tube layer.
ADJUST – BLUR – GAUSSIAN BLUR – RADIUS 25 - OK.
Change BLEND MODE of copy of tube layer to HARD LIGHT and change the original tube layer to LUMINANCE (L). Reduce OPACITY to 75%.
(see tag for placement)
Lets do some elements now:
Wordart - C/P and leave where it lands. Make sure it is UNDER the frame layers. Used the same settings as bellow, but for the color I used white and then I did it a second time and changed the V&H to -2. Then I did a regular drop shadow with color black.
(see tag for placement)
Element 17 - C/P and re-size 80%. Move to the right side of tag. Duplicate and mirror. Make sure these layers are UNDER the frame layers.
(see tag for placement)
Element 16 - C/P and re-size 50%. Move to top left corner of frame. Duplicate and mirror. Make sure this layer is OVER the frame layer.
(see tag for placement)
Element 14 - C/P and re-size 40%. Move to top left corner of frame over element 16. Duplicate and mirror.
(see tag for placement)
Element 11 - C/P and re-size 60%. Move to bottom right side of frame. Duplicate and mirror.
(see tag for placement)
Element 22 - C/P and re-size 40%. Move to bottom right side of tag.
(see tag for placement)
Element 10 - C/P and re-size 30%. Move to bottom right side of tag in beside element 22.
(see tag for placement)
Element 24 - C/P and re-size 40%. Move to bottom middle of frame.
(see tag for placement)
Now for the tube(s):
If you are using the same tube as me, grab the full size tube now. C/P and move her to the far left side of tag.
(see tag for placement)
Add drop shadow to layers of your choosing.
I used:
V & H 2
Opacity 70
Blur 7
Color Black
Now you can add name and © information.
Save as .png and re-size if you wish.
Save and add
name and © info.
Let me know what you think of
this tutorial.
Monday, 3 February 2014

This tutorial was written by me on February 3, 2014.
It was made out of my own creation and any similarity is purely coincidental.
I used PSPx2 but any version will do.
Artist: Amy Matthews
You can find this tube at Creative Design Outlet HERE
Please Don't use this tube without a license.
Scrap Kit: IB Scrap Kit PinUp Toons Individual Tube 184-3
by Monti's Scraps
You can find this kit at Creative Design Outlet HERE
Mask: WSL 84 HERE
Here goes:
New Raster – 800 X 800.
Open Paper 4. Open mask (WSL 84) and minimize.
SELECTIONS – SELECT ALL – Copy and paste Paper 4 into selection.
Go to LAYERS – NEW MASK LAYER – FROM IMAGE – SOURCE LUMINANCE - CHECKED – from menu, find WSL 84 – OK. Duplicate and merge down. Re-size 115%
Frame 1 - C/P and move it up just a tad on tag.
Make sure Frame 1 is the highlighted layer. Grab your magic wand. Click in the middle of the frame layer.
Go to SELECTIONS - MODIFY - EXPAND 8 PIXELS - INVERT.
Open New Raster Layer. C/Paste into selection Paper 4.
Keep selected.
Now grab the tube you are using. If you are using the same one as me, grab the CU now. C/P and move her into position.
SELECTIONS - INVERT - DELETE - SELECTIONS - INVERT.
Duplicate the tube layer.
ADJUST – BLUR – GAUSSIAN BLUR – RADIUS 25 - OK.
Change BLEND MODE of copy of tube layer to HARD LIGHT and change the original tube layer to BURN.
(see tag for placement)
Lets do some elements now:
Element 23 - C/P and move to top left corner of tag. Duplicate, mirror and flip. Make sure these layers are UNDER the frame layers.
(see tag for placement)
Element 3 - C/P and move to right side of frame. Make sure this layer is OVER the frame layer.
(see tag for placement)
Element 4 - C/P and move to bottom of frame layer.
(see tag for placement)
Element 1 - C/P and re-size 25%. Move to bottom and a bit right on tag.
(see tag for placement)
Element 2 - C/P and re-size 50%. Move to bottom left side of tag.
(see tag for placement)
Element 12 - C/P and re-size 40%. Move to bottom left side of tag in front of element 2.
(see tag for placement)
Element 14 - C/P and re-size 60%. Move to bottom and a little left on tag in front of element 2 but to left of element 1.
(see tag for placement)
Element 5 - C/P and re-size 30%. Move to bottom left side of tag in front of element 12.
(see tag for placement)
Element 8 - C/P and re-size 20%. Move to bottom left corner of tag in front of element 12 and 5.
(see tag for placement)
Element 7 - C/P and re-size 20%. Move to bottom left side between element 5 and 14.
(see tag for placement)
Wordart - C/P and move to top left side of frame. I used a drop shadow on the wordart so you could see it better. Used the same settings as bellow, but for the color I used white and then I did it a second time and changed the V&H to -2. Then I did a regular drop shadow with color black.
(see tag for placement)
Now for the tube(s):
If you are using the same tube as me, re-size whole tag from 800 X 800 to 600 X 600. C/P and mirror tube. Move her to the far right side of tag.
(see tag for placement)
Add drop shadow to layers of your choosing.
I used:
V & H 2
Opacity 70
Blur 7
Color Black
Now you can add name and © information. Save as .png and re-size if you wish.
Make sure Frame 1 is the highlighted layer. Grab your magic wand. Click in the middle of the frame layer.
Go to SELECTIONS - MODIFY - EXPAND 8 PIXELS - INVERT.
Open New Raster Layer. C/Paste into selection Paper 4.
Keep selected.
Now grab the tube you are using. If you are using the same one as me, grab the CU now. C/P and move her into position.
SELECTIONS - INVERT - DELETE - SELECTIONS - INVERT.
Duplicate the tube layer.
ADJUST – BLUR – GAUSSIAN BLUR – RADIUS 25 - OK.
Change BLEND MODE of copy of tube layer to HARD LIGHT and change the original tube layer to BURN.
(see tag for placement)
Lets do some elements now:
Element 23 - C/P and move to top left corner of tag. Duplicate, mirror and flip. Make sure these layers are UNDER the frame layers.
(see tag for placement)
Element 3 - C/P and move to right side of frame. Make sure this layer is OVER the frame layer.
(see tag for placement)
Element 4 - C/P and move to bottom of frame layer.
(see tag for placement)
Element 1 - C/P and re-size 25%. Move to bottom and a bit right on tag.
(see tag for placement)
Element 2 - C/P and re-size 50%. Move to bottom left side of tag.
(see tag for placement)
Element 12 - C/P and re-size 40%. Move to bottom left side of tag in front of element 2.
(see tag for placement)
Element 14 - C/P and re-size 60%. Move to bottom and a little left on tag in front of element 2 but to left of element 1.
(see tag for placement)
Element 5 - C/P and re-size 30%. Move to bottom left side of tag in front of element 12.
(see tag for placement)
Element 8 - C/P and re-size 20%. Move to bottom left corner of tag in front of element 12 and 5.
(see tag for placement)
Element 7 - C/P and re-size 20%. Move to bottom left side between element 5 and 14.
(see tag for placement)
Wordart - C/P and move to top left side of frame. I used a drop shadow on the wordart so you could see it better. Used the same settings as bellow, but for the color I used white and then I did it a second time and changed the V&H to -2. Then I did a regular drop shadow with color black.
(see tag for placement)
Now for the tube(s):
If you are using the same tube as me, re-size whole tag from 800 X 800 to 600 X 600. C/P and mirror tube. Move her to the far right side of tag.
(see tag for placement)
Add drop shadow to layers of your choosing.
I used:
V & H 2
Opacity 70
Blur 7
Color Black
Now you can add name and © information. Save as .png and re-size if you wish.
Save and add
name and © info.
Let me know what you think of
this tutorial.
I would love to see any results.
Subscribe to:
Posts
(Atom)